
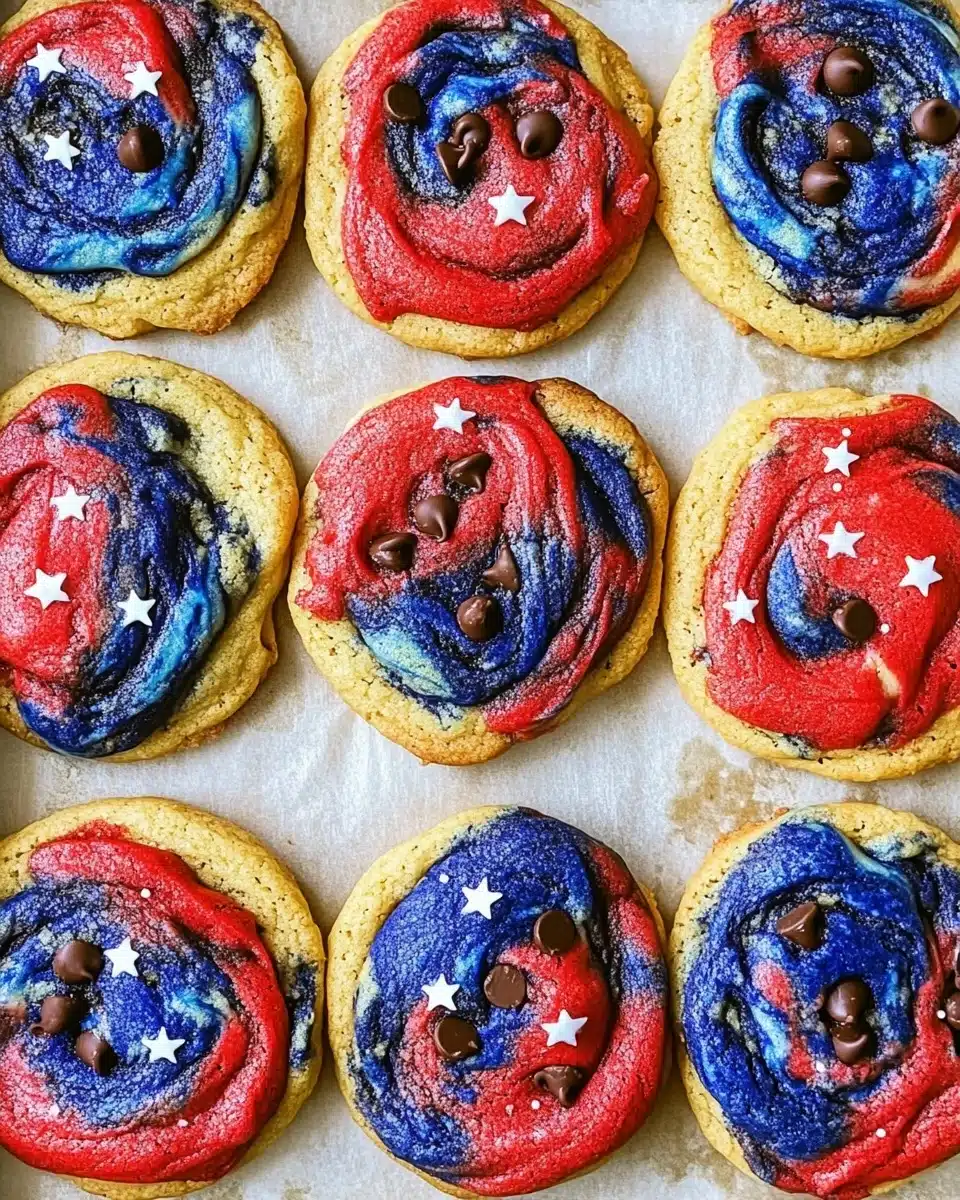
If there’s one treat that steals the show every summer, it’s these 4th of July Cookies! With festive swirls of red, white, and blue, a shower of glittery stars, and a soft, chewy bite loaded with milk chocolate chips, these cookies are guaranteed to add a spark to your Independence Day celebrations—or any day you want to bring a little extra fun to the dessert table.
Why You’ll Love This Recipe
- Celebration in Every Bite: These 4th of July Cookies are a true showstopper, bursting with patriotic color and sparkling with edible glitter stars for that perfect holiday wow factor.
- Bakery-Style Softness: A blend of all-purpose and cake flour gives these cookies an exceptionally soft, chewy center with the slightest crisp edge—totally irresistible.
- Simple Ingredients, Big Results: Pantry staples come together with easy-to-find decorations, so it’s a recipe anyone can master, even if you’re baking with kids or for a crowd.
- Customizable for All Occasions: Swap out the colors or toppings and you’ve got a template for creative cookies any time of the year—not just the 4th!

Ingredients You’ll Need
The vibrant magic of these 4th of July Cookies comes together from ingredients you already trust in your baking, plus a playful dash of red and blue coloring for that festive finish. Here’s how each one makes the cookies just a little bit more special.
- All-Purpose Flour: The sturdy backbone of the dough that gives these cookies their structure and classic chewy texture.
- Cake Flour: This may sound fancy, but it’s essential for super-soft bakery-style cookies—worth picking up if you don’t keep it on hand!
- Cornstarch: Helps create that irresistible tender bite and prevents the cookies from spreading too much.
- Baking Soda & Baking Powder: A balanced combo ensures lift and just the right thickness for each cookie.
- Salt: Don’t skip it! Even just a teaspoon punches up all the sweet, buttery flavors.
- Unsalted Butter, Cold & Cubed: The secret to rich flavor and thick, chunky cookies—no melted or softened here!
- Brown Sugar (light or dark): Adds moisture and that classic molasses undertone—dark brown sugar tastes a little deeper, but either will work beautifully.
- Granulated Sugar: Balances the brown sugar for a sweet, light crumb.
- Eggs + Extra Yolks: Egg yolks promise richness and help the cookies stay chewy for days.
- Vanilla Extract: Lends an inviting aroma and rounds out the chocolatey vibes.
- Milk Chocolate Chips: Pockets of gooey chocolate turn every bite into a treat—use less for a more “doughy” cookie, more for maximal decadence!
- Red and Blue Gel Food Coloring: For bold, vivid colors that won’t water down your dough (choose gel over liquid dyes for best results).
- Edible Glitter Stars: The finishing touch that turns every cookie into a party on the plate!
Variations
Baking these 4th of July Cookies is all about sharing the love in your own way—don’t be afraid to put your personal spin on them! It’s incredibly easy to adjust the colors, swap decorations, or make the recipe fit dietary needs.
- Chocolate Chip Swap: Prefer semi-sweet or white chocolate? Substitute your favorite chip or chopped chocolate bar for a twist on tradition.
- Gluten-Free Version: Use a one-to-one gluten-free all-purpose flour blend for flour and cake flour—you’ll still get wonderful results!
- Dye-Free and Natural: Try beet powder or freeze-dried blueberry powder in small amounts for naturally colored dough, or embrace the classic “chocolate chip” look and skip food coloring altogether.
- Different Shapes and Sizes: Make large bakery cookies, mini bites, or even cookie bars—just adjust baking time accordingly.
- All-Occasion Style: Switch up the colors and sprinkles by season—think pastels for spring, orange and black for Halloween, or red and green for Christmas cookies!
How to Make 4th of July Cookies
Step 1: Prep Your Pans & Mix the Dry Ingredients
Start by lining two baking sheets with parchment paper or silicone mats—this makes it effortless to slide your cookies off later. Next, whisk together all-purpose flour, cake flour, cornstarch, baking soda, baking powder, and salt in a big bowl, making sure there are no lumps and everything’s well blended.
Step 2: Cream Butter and Sugars
Pop your cold, cubed butter and both sugars into the bowl of a stand mixer fitted with the paddle attachment. Beat for about 2-3 minutes until the mixture is smooth, light, and creamy—this step sets the stage for thick, bakery-style cookies with gorgeous texture.
Step 3: Add the Eggs and Vanilla
Add in your eggs, the two extra yolks, and vanilla extract. Mix everything just until it comes together, and if you notice any sticky bits clinging to the bowl, scrape them down with a spatula and blend again. This ensures your cookies are rich, flavorful, and perfectly moist.
Step 4: Combine Wet and Dry, Then Stir in Chocolate Chips
Gradually add the dry ingredient blend to your wet mixture, mixing on low just until all the flour disappears—avoid over-mixing to keep the cookies tender. The final flourish is folding in all those luscious milk chocolate chips; mix just until evenly distributed.
Step 5: Divide and Color the Dough
Separate your dough into three equal pieces—using a kitchen scale helps here. Tint one with red gel food coloring, another with blue, and leave the last one plain for that patriotic flair. Gel color works wonders, giving vibrant hues without making the dough sticky. If the dough softens up, a few minutes in the fridge will make it easier to work with.
Step 6: Form Swirl Log and Shape Cookies
Roll each colored section into a long 15-inch log, then place all three side by side on a sheet of plastic wrap. Bundle them together tightly, then gently roll to create one big, multi-colored log. Slice off chunks, roll into balls, and place them spaced out on your baking sheets. Now you’re ready for baking magic!
Step 7: Bake, Cool, and Decorate
Bake in a preheated 400°F oven for about 10 minutes, just until the edges look set. Let the cookies sit on the pan for 5-10 minutes—they finish setting as they cool. While still soft, press extra chocolate chips and plenty of edible glitter stars on top. Transfer to a rack, and prepare to be amazed!
Pro Tips for Making 4th of July Cookies
- Chill for Clean Swirls: If your dough gets too soft after coloring, a quick chill in the fridge (10–15 minutes) keeps those patriotic swirls sharp and bold when baked.
- Measuring Makes Magic: Use a digital scale to divide the dough evenly for perfectly even colors and picture-worthy cookies.
- Rest After Baking: Letting cookies cool on the baking sheet for several minutes after baking ensures thick, sturdy cookies that won’t fall apart when moved.
- Final Touches: For a true bakery look, press extra chips and glitter stars on top while the cookies are still warm—the toppings will gently adhere and look extra tempting.
How to Serve 4th of July Cookies

Garnishes
Make your 4th of July Cookies the star of the spread with a generous dusting of edible glitter stars right after baking. For even more pizzazz, add a sprinkle of red, white, and blue nonpareils or drizzle with bright royal icing—there’s no such thing as too festive here!
Side Dishes
These cookies shine beside fresh summer berries, a scoop of vanilla ice cream, or a frosty pitcher of lemonade. Create a patriotic dessert board by serving the cookies with other red, white, and blue treats like strawberry shortcake or blueberry trifles for a show-stopping finale to your cookout.
Creative Ways to Present
Stack your 4th of July Cookies in a clear glass jar, or tie them up in cellophane bags with a twist of ribbon for party favors. Arrange them in a star-shaped platter, or alternate with sparkler picks for an extra burst of celebration—kids (and adults!) will race to grab one.
Make Ahead and Storage
Storing Leftovers
Keep your 4th of July Cookies soft and chewy by storing them in an airtight container at room temperature—they’ll stay fresh for up to 5 days. Slip a slice of bread into the container to help lock in moisture if your house tends to be dry.
Freezing
Baked cookies freeze beautifully for up to 3 months! For best results (and the freshest taste), freeze the shaped cookie dough balls on a baking sheet, then transfer to zipper-top bags. That way, you can bake fresh cookies on demand and always wow your guests.
Reheating
To relive that fresh-from-the-oven magic, pop a cookie in the microwave for 8–10 seconds or warm them briefly in a 300°F oven for a few minutes. The chocolate will get gooey, and every bite will feel like a celebration all over again!
FAQs
-
Can I use regular food coloring instead of gel for 4th of July Cookies?
Gel food coloring is highly recommended because it produces bright, bold colors without changing the texture of your dough. If you only have liquid food coloring, you can use it, but the colors may be more pastel and you’ll need to add quite a bit more—just be careful not to overdo it or the dough might become sticky.
-
Can I make these cookies smaller or larger?
Absolutely! This 4th of July Cookies recipe is super flexible. For smaller cookies, just use less dough per cookie and reduce the bake time by about 1-2 minutes. For giant cookies, portion out larger balls and give them a little extra time in the oven—watch for golden edges and a soft center.
-
Do I need to chill the dough before baking?
You don’t have to, but chilling the dough for 10–20 minutes after coloring helps make it easier to handle and keeps the swirls sharp. It can also help prevent spreading if your kitchen is warm—especially if you want picture-perfect cookies!
-
Can I make 4th of July Cookies ahead of time?
Yes! You can freeze the pre-shaped dough balls for up to 3 months and bake them fresh on party day. Baked cookies also stay delicious for several days stored airtight, so you can prep them in advance for stress-free entertaining.
Final Thoughts
I hope you’ll give these 4th of July Cookies a try and share them with everyone you love this summer. There’s something pure, nostalgic, and a little bit magical about baking up bright, festive sweets that make everyone’s eyes light up—these cookies deliver all that and more. Happy baking, and happy celebrating!
Print
4th of July Cookies Recipe
- Prep Time: 30 minutes
- Cook Time: 10 minutes
- Total Time: 40 minutes
- Yield: 12 giant cookies (or 24 small)
- Category: Dessert
- Method: Baking
- Cuisine: American
- Diet: Vegetarian
Description
Celebrate the 4th of July with these festive red, white, and blue cookies that are perfect for your holiday gathering. These soft and chewy cookies are loaded with milk chocolate chips and topped with edible glitter stars for an extra special touch.
Ingredients
Dry Ingredients
- 2 1/2 cups all-purpose flour
- 1 1/2 cups cake flour
- 2 tsp. cornstarch
- 1 tsp. baking soda
- 1 tsp. baking powder
- 1 tsp. salt
Cookie Dough
- 1 cup cold, unsalted butter, cubed
- 1 cup brown sugar, packed (dark or light)
- 1/2 cup granulated sugar
- 2 large eggs
- 2 large egg yolks
- 2 tsp. vanilla extract
Additional Ingredients
- 3 cups milk chocolate chips (or less if desired)
- Red and blue gel food coloring
- Edible glitter stars
Instructions
- Prepare Dough: Combine dry ingredients in a bowl. Cream butter and sugars. Add eggs, yolks, and vanilla. Gradually mix in dry ingredients. Fold in chocolate chips.
- Color and Shape Dough: Divide dough, color with red and blue food coloring, shape into logs, and chill. Cut into cookies and bake.
- Decorate: Top warm cookies with additional chocolate chips and edible glitter stars. Enjoy!
Notes
- For smaller cookies, reduce baking time slightly.
- Recipe can be halved to make fewer cookies.
- Store in an airtight container for 3-5 days at room temperature or freeze for up to 3 months.
- Cookie dough can be frozen for up to 3 months. Shape into balls before freezing.
- Inspired by Cookies and Cups Patriotic Cookies.
Nutrition
- Serving Size: 1 cookie
- Calories: 428 kcal
- Sugar: 20g
- Sodium: 337mg
- Fat: 34g
- Saturated Fat: 21g
- Unsaturated Fat: 6g
- Trans Fat: 1g
- Carbohydrates: 57g
- Fiber: 1g
- Protein: 6g
- Cholesterol: 102mg


