

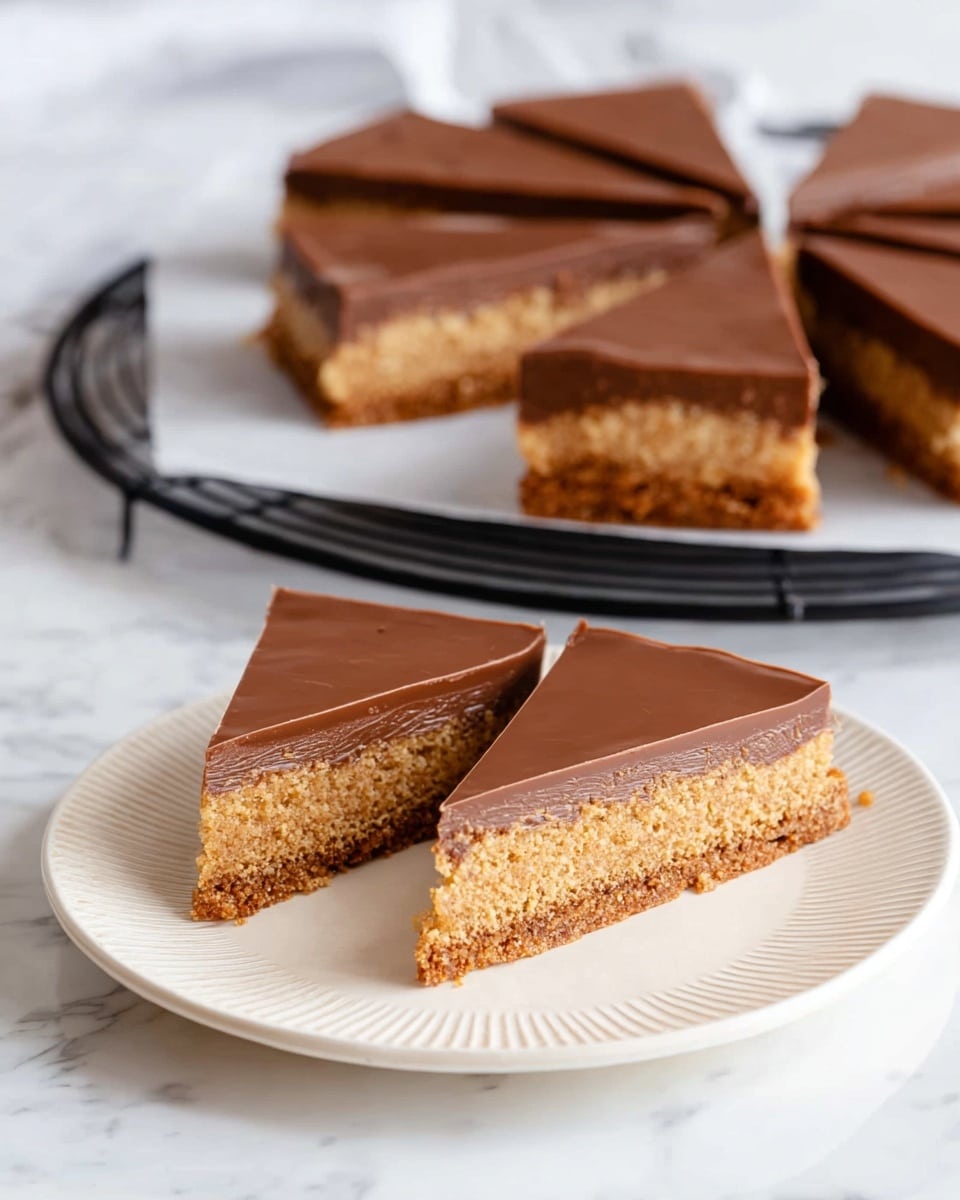
If you’ve been hunting for that perfect crunchy, chocolaty slice that reminds you of backyard barbies and afternoon tea in Aussie sunshine, the Aussie Crunch – Chocolate Coconut Slice Recipe is an absolute winner. I love this recipe because it perfectly balances the caramelized coconut crunch with a rich chocolate layer on top – it’s like a little bite of nostalgia in every piece. You’ll find it’s a trusty crowd-pleaser for everything from school lunch boxes to casual get-togethers.
When I first tried the Aussie Crunch – Chocolate Coconut Slice Recipe, I was amazed at how simple the process was, yet the results felt so special. This recipe is ridiculously forgiving, so even if you’re not a seasoned baker, you’ll enjoy making it as much as eating it. Plus, the crunchy texture combined with chocolate makes it incredibly addictive—you might want to make a double batch!
Why You’ll Love This Recipe
- Crunchy, Nostalgic Texture: The combination of crushed cornflakes and coconut gives this slice that unbeatable crunch you’ll crave.
- Super Easy to Make: This recipe comes together quickly, so you can have a delicious treat without hours in the kitchen.
- Perfect for Any Occasion: Lunchboxes, afternoon tea, or a quick dessert – it fits every moment effortlessly.
- Family Friendly: Everyone loves it: my kids gobble it up and friends always ask for the recipe!

Ingredients You’ll Need
The magic of the Aussie Crunch – Chocolate Coconut Slice Recipe is in its simple ingredients that come together beautifully. Most are pantry essentials, which makes this slice a go-to treat whenever you’re craving something sweet and crunchy.
- Butter: I prefer salted butter for a richer flavor, but unsalted works too.
- Caster sugar (superfine sugar): It melts smoothly and sweetens evenly; brown sugar can work in a pinch for a deeper caramel note.
- Golden syrup: This is key for that signature caramelized taste—if you don’t have it, honey or molasses make decent substitutes.
- Desiccated coconut: Adds delicious chewiness and pairs perfectly with the crunchy base.
- Cornflakes: Crush them by hand or with a spoon for that crisp texture. Don’t over-crush—you want bits, not powder.
- Self-raising flour: If you don’t have this, use plain flour with a bit of baking powder and a tiny pinch of baking soda.
- Cocoa powder: Adds subtle chocolate richness without overwhelming the slice.
- Cadbury milk chocolate block: This is the crowning glory—you’ll melt it for the glossy chocolate topping that everyone loves.
Variations
One of my favorite things about the Aussie Crunch – Chocolate Coconut Slice Recipe is how easy it is to make it your own. Over time, I’ve tweaked it in different ways, and you can totally do the same to suit your taste or dietary needs.
- Nutty Twist: I sometimes sprinkle chopped macadamias or walnuts into the base for a delightful crunch contrast that my family loves.
- Gluten-Free Version: Swap the flour for a gluten-free baking mix, and use gluten-free cornflakes; it works seamlessly without sacrificing texture.
- Dairy-Free Alternative: Use coconut oil instead of butter and dairy-free chocolate — still delicious and perfect if you’re avoiding dairy.
- Extra Chocolatey: Add a drizzle of melted dark chocolate on top of the milk chocolate layer for a rich double choc experience.
How to Make Aussie Crunch – Chocolate Coconut Slice Recipe
Step 1: Prepare Your Base Mix
Start by preheating your oven to 180°C (360°F) — this ensures the oven’s hot and ready when your slice mix is done. Melt the butter in a large saucepan over low heat, then add caster sugar, golden syrup, desiccated coconut, cocoa powder, and self-raising flour. Stir gently but thoroughly so everything becomes a homogenous chocolatey batter. Finally, fold in the crushed cornflakes carefully, so the flakes keep plenty of their crunch and don’t get too mushy.
Step 2: Press and Bake the Base
Transfer the mix straight into a lined or greased 20 x 30 cm (8 x 12 inch) slice pan. Use the back of a spoon or spatula to firmly press it down — don’t be shy about pushing firmly, especially into the corners, to create an even surface. This helps the slice hold together after baking. Bake in your preheated oven for about 25 minutes, or until the edges turn slightly golden. Then remove it and let the slice cool completely in the pan; the base firms up nicely as it cools.
Step 3: Melt Chocolate and Top the Slice
While the base cools, break the Cadbury milk chocolate block into pieces and place them in a microwave-safe bowl. Heat in 30-second bursts, stirring in between each, to avoid burning and ensure smooth melting. Once melted and silky, spread the chocolate evenly over the cooled base with the back of a spoon or a spatula. Pop the slice in the fridge and let it set for at least 15 minutes — that way the chocolate topping hardens to a shiny, irresistible finish.
Step 4: Slice and Serve
After setting, you can slice your Aussie Crunch into triangles, squares, or even little rectangles — I’ve learned to just do whatever shape my crowd prefers, but triangles have that classic look! Use a sharp knife and wipe it between cuts for the cleanest slices. And that’s it — your homemade Aussie Crunch – Chocolate Coconut Slice is ready to enjoy. Serve right away or pack it up for snacks or lunch boxes.
Pro Tips for Making Aussie Crunch – Chocolate Coconut Slice Recipe
- Don’t Over-Crush the Cornflakes: I crush them gently using the back of a spoon to keep the bite satisfying.
- Firm Pressing Is Key: Press the mixture really well into the pan to prevent crumbly slices.
- Microwave Chocolate Slowly: Melting in short bursts avoids scorching and keeps your coating smooth.
- Slice After Chocolate Sets Completely: Cutting too soon can cause the chocolate to crack and crumble.
How to Serve Aussie Crunch – Chocolate Coconut Slice Recipe
Garnishes
I usually keep it simple with this slice because the chocolate top looks gorgeous on its own. But if I’m feeling fancy, I sprinkle a few toasted coconut flakes or a light dusting of cocoa powder on top before chilling. It adds a little extra texture and makes the slice look like it was made for a café display.
Side Dishes
I love pairing this slice with a hot cuppa tea or a cold glass of milk to balance the sweetness. For a brunch setup, this goes beautifully alongside fresh fruit or a light salad – the contrast keeps things nicely balanced on the palate.
Creative Ways to Present
For birthday parties or special occasions, I’ve cut the slice into mini bite-sized squares and served them on pretty platters with a sprinkle of edible gold dust or mini chocolate chips. It instantly upgrades this humble treat to something a little more party-worthy!
Make Ahead and Storage
Storing Leftovers
I keep leftovers in an airtight container in the fridge, and they remain lovely and crunchy for up to a week. It’s perfect for nibbling on those busy weekdays when you want a quick sweet pick-me-up.
Freezing
Since this slice freezes really well, I sometimes cut it into squares and freeze them wrapped individually in baking paper and then in a freezer bag. Just pop them out a bit before you want to eat—thaw at room temperature or straight into lunchboxes for a cool treat.
Reheating
I prefer to enjoy this slice cold or at room temperature, but if you want to warm it slightly, a few seconds in the microwave (about 10–15 seconds) is plenty to soften the chocolate without melting it too much.
FAQs
-
Can I use a different type of cereal instead of cornflakes?
Absolutely! While cornflakes are traditional and give that classic crunch, you can swap them for rice bubbles or crushed weetbix if you prefer. Just make sure to crush them well but keep some texture for the best results.
-
Can I make the chocolate topping dairy-free?
Yes, using dairy-free chocolate blocks or chips works just as well. You can melt them the same way and still get a rich, satisfying topping that complements the slice perfectly.
-
What can I use if I don’t have golden syrup?
If you don’t have golden syrup on hand, honey, molasses, or even brown sugar melted down can be good substitutes. The golden syrup gives a caramelized depth but feel free to experiment with what you’ve got.
-
How long does this slice keep fresh?
Stored properly in the fridge inside an airtight container, your Aussie Crunch slice will stay fresh and tasty for up to a week. Just keep the chocolate topping intact for the best texture.
Final Thoughts
I honestly can’t recommend the Aussie Crunch – Chocolate Coconut Slice Recipe enough. It’s one of those recipes that brings back happy memories while still tasting fresh and exciting every time you make it. I love how effortlessly it comes together and how my family’s always sneaking extra pieces when they think I’m not looking. Next time you want to whip up something nostalgic, simple, and utterly delicious, this slice will be your new best mate in the kitchen.
Print
Aussie Crunch – Chocolate Coconut Slice Recipe
- Prep Time: 5 minutes
- Cook Time: 25 minutes
- Total Time: 45 minutes
- Yield: 12 triangles
- Category: Dessert
- Method: Baking
- Cuisine: Australian
Description
Aussie Crunch – Chocolate Coconut Slice is a deliciously rich and crunchy treat featuring a buttery base mixed with coconut, cocoa, and cornflakes, topped with a smooth layer of melted Cadbury milk chocolate. Perfectly baked to create a caramelized texture with a chocolate finish, this slice is ideal for snacks, lunchboxes, or a delightful dessert.
Ingredients
For the Slice Base:
- 200 g salted butter
- 1/2 cup caster sugar / superfine sugar (100 g)
- 2 tbsp golden syrup
- 1 cup desiccated coconut (heaped, 80 g)
- 3 cups crushed cornflakes (90 g)
- 1 cup self-raising flour (heaped, 150 g)
- 1.5 tbsp cocoa powder
For the Chocolate Top:
- 1 block Cadbury milk chocolate (180 g)
Instructions
- Preheat the Oven: Preheat your oven to 180°C (360°F) to ensure it’s at the right temperature for baking the base slice perfectly.
- Melt Butter and Combine Ingredients: Place a large saucepan over low heat. Add the butter and let it melt gently. Then add the caster sugar, golden syrup, desiccated coconut, cocoa powder, and self-raising flour. Mix well until all ingredients are thoroughly combined.
- Add Crushed Cornflakes and Mix: Add the crushed cornflakes last to the saucepan and mix once more to incorporate them evenly into the mixture.
- Press Mixture into Tray: Pour the combined mixture into a 20 x 30 cm (8 x 12 inches) slice or glass baking tray. Using the back of a spoon or spatula, press the mixture firmly and flatten it, paying special attention to corners to create an even layer.
- Bake the Slice Base: Place the tray in the preheated oven and bake for about 25 minutes, allowing the base to set with a slightly caramelized, crunchy texture.
- Cool the Baked Base: Remove the tray from the oven and allow the slice base to cool completely; this helps the chocolate topping set properly later.
- Melt the Chocolate: Break the Cadbury milk chocolate into pieces and place in a microwave-safe bowl. Melt in 30-second intervals, stirring between each interval until smooth and fully melted.
- Layer the Chocolate: Spread the melted chocolate evenly over the cooled slice base using a spatula, creating a smooth chocolate layer on top.
- Set the Chocolate Top: Place the tray in the fridge for a minimum of 15 minutes to allow the chocolate topping to firm up completely.
- Slice and Serve: Once set, remove from the fridge and slice into your preferred shapes—triangles, squares, or long slices—and serve immediately or pack for snacks and lunch boxes.
Notes
- Storage: Store the slices in an airtight container in the fridge for up to one week. For longer storage, cut into bite-sized pieces and freeze—they make ideal snacks or lunchbox treats.
- Crushing Cornflakes: Use the back of a spoon to crush cornflakes in a bowl, or place them in a bag and crush by hand for the perfect texture.
- Shape Options: While triangles are a classic choice, feel free to keep your slices as squares or long strips—no one will know!
- Butter: Salted butter is used, but unsalted butter or margarine can also be substituted.
- Flour: If you don’t have self-raising flour, substitute with all-purpose flour plus 1 tsp baking powder and ½ tsp baking soda.
- Golden Syrup Alternatives: Honey, brown sugar, or molasses can replace golden syrup, offering a similar caramelized flavor.
- Sugar Variations: Caster sugar can be swapped with any white sugar or brown sugar.
- Cornflakes Swap: For a different crunch, substitute crushed cornflakes with rice bubbles or weetbix.
Nutrition
- Serving Size: 1 triangle (approximately 50 g)
- Calories: 275
- Sugar: 13 g
- Sodium: 173 mg
- Fat: 18 g
- Saturated Fat: 13 g
- Unsaturated Fat: 4 g
- Trans Fat: 0 g
- Carbohydrates: 27 g
- Fiber: 2 g
- Protein: 3 g
- Cholesterol: 36 mg


