

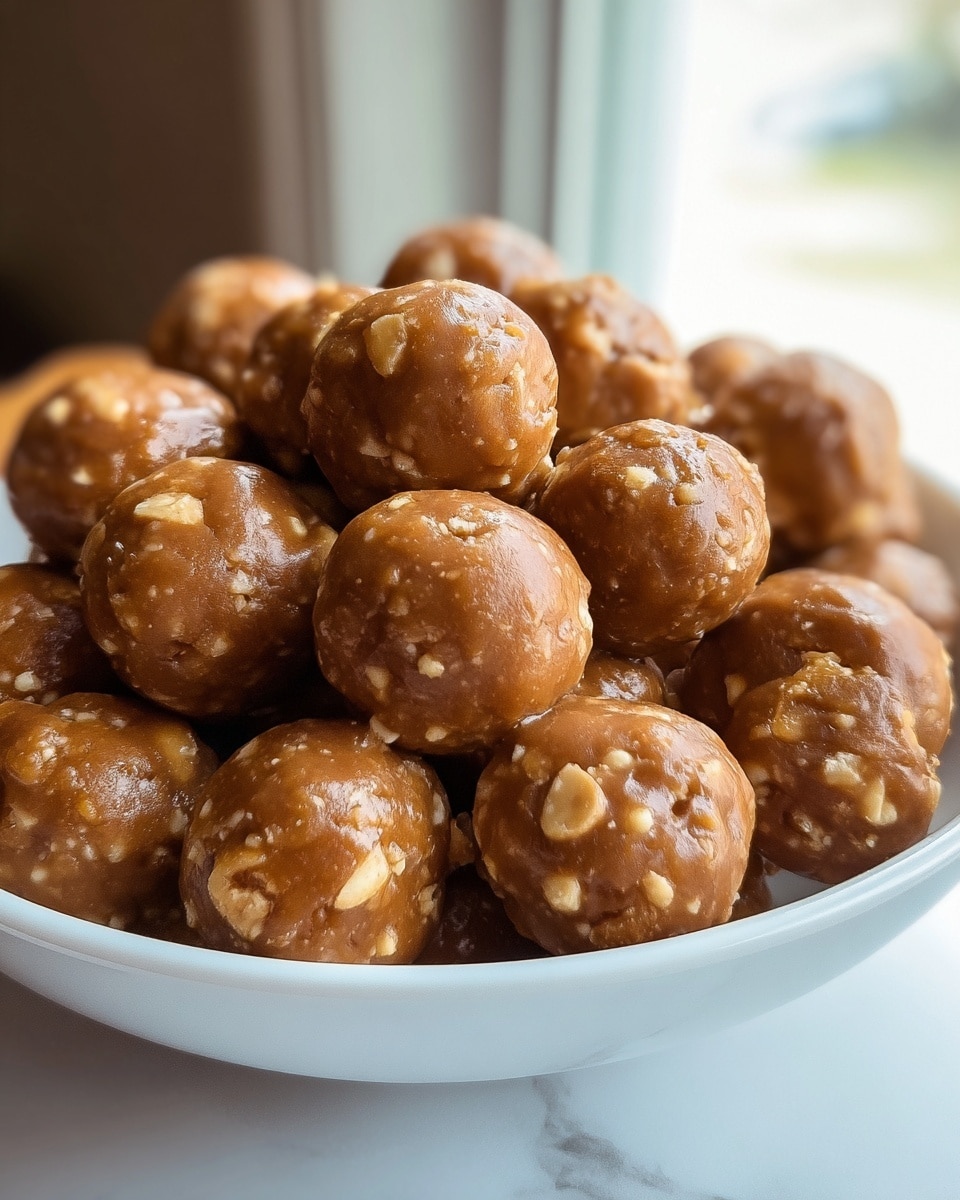
If you’re craving a no-fuss, super satisfying treat, the Butterfinger Balls: Easy No-Bake Peanut Butter Treats Recipe is an absolute winner. I love how this recipe combines the classic crunch and sweet peanut butter flavor with that unmistakable Butterfinger bar bite, all wrapped up in a rich chocolate coating. It’s one of those recipes that feels fancy but comes together in a flash—perfect when you want something delicious with minimal mess.
What makes these butterfinger balls truly special is how simple they are to make, yet how impressively tasty they turn out. Whether you’re prepping for a party, looking for an easy dessert to bring to potluck, or just craving a sweet snack to pair with your afternoon coffee, this Butterfinger Balls: Easy No-Bake Peanut Butter Treats Recipe always hits the spot. Trust me, once you try them, you’ll keep this recipe close for any occasion.
Why You’ll Love This Recipe
- No-Bake Convenience: You can whip these up without turning on the oven—perfect for hot days or last-minute cravings.
- Perfect Balance of Flavors: The creamy peanut butter pairs beautifully with crunchy Butterfinger pieces and smooth chocolate coating.
- Kid-Friendly and Crowd-Pleasing: My family goes wild for these – they’re perfect for parties, holiday treats, or after-school snacks.
- Make-Ahead Friendly: Freeze them to enjoy later or prepare in advance for stress-free entertaining.

Ingredients You’ll Need
Each ingredient here plays a key role in creating the perfect texture and flavor of these butterfinger balls. When shopping, try to pick creamy peanut butter and fresh Butterfinger bars for the best results.
- Butter: Softened butter blends easily with peanut butter to make a smooth base.
- Vanilla extract: Adds a subtle warmth and depth to the flavor.
- Peanut butter: Use the classic creamy kind like Jif or Skippy; avoid natural brands that separate to keep the mixture consistent.
- Powdered sugar: Sweetens and helps firm up the dough without grittiness.
- Graham cracker crumbs: Give that great crunchy texture that balances the creamy base.
- Crushed Butterfinger bars: The star of the show, adding that uniquely crispy, buttery candy bar flavor.
- Chocolate bark or chocolate chips: For coating the balls and making them look—and taste—like irresistible little bites of chocolatey goodness.
- Optional toppings: Extra crushed Butterfinger bits, festive sprinkles, or coarse sea salt to elevate the look and flavor.
Variations
I love experimenting with this recipe to keep things fresh and tailored to what I have on hand or the occasion. Try out some of these variations to make the Butterfinger Balls: Easy No-Bake Peanut Butter Treats Recipe your own.
- Chocolate Type Swap: I’ve used dark chocolate for a more intense flavor and white chocolate for a sweeter, creamier finish—both work beautifully.
- Nut Butter Alternatives: Swapping peanut butter for almond or cashew butter gives a nice twist for different nut lovers, though the peanut flavor is classic.
- Salted Finish: Sprinkling coarse sea salt on top right after dipping adds an incredible sweet-salty contrast that my guests rave about.
- Double-Dip: For a fancy look, dip the balls once in milk chocolate, freeze, then drizzle with white chocolate—perfect for gift giving.
How to Make Butterfinger Balls: Easy No-Bake Peanut Butter Treats Recipe
Step 1: Cream the Base Ingredients
Start by combining softened butter and creamy peanut butter in a large bowl. I usually use my hand mixer here because it really gets it silky smooth without much effort. The smooth texture you want is key to avoiding lumps and ensuring a creamy bite later. Add the vanilla extract and mix just until it’s all combined and fragrant—don’t over-mix here or it could get too soft.
Step 2: Sweeten and Add Crunch
Next, slowly mix in the powdered sugar on a low speed. This part requires a bit of patience since the sugar dust can get everywhere—scraping down the bowl helps keep everything even. Then gently fold in the graham cracker crumbs along with the crushed Butterfinger pieces. You’ll see the dough start to look more cohesive but with just the right amount of texture.
Step 3: Shape and Chill
Line a baking sheet with parchment paper, then scoop out rounded tablespoons of the mixture and roll them into balls with your hands. I like to keep a small bowl of water nearby to dip my fingers in when rolling—this stops the dough from sticking to your hands. Space them out on the sheet and pop them into the freezer for about 30 minutes. This chilling step is crucial to firm them up so they hold their shape when dipped later.
Step 4: Melt and Dip the Chocolate
While your balls are chilling, melt your chocolate bark or chips in the microwave at 50% power, heating in short 30-second bursts and stirring in between. It can be tempting to blast the chocolate, but trust me—you want it silky and smooth, not lumpy or burnt. Once melted, take the chilled balls and dunk them in chocolate either fully or halfway, depending on your preference. Then immediately top with extra crushed Butterfinger bits, sprinkles, or sea salt before the chocolate hardens.
Step 5: Let Them Set and Enjoy!
Place the dipped balls back on the parchment and let the chocolate set completely. You can speed this up by putting them in the fridge for about 10-15 minutes. Once set, they’re ready to impress your friends, family, or just satisfy your sweet tooth at home.
Pro Tips for Making Butterfinger Balls: Easy No-Bake Peanut Butter Treats Recipe
- Choose Your Peanut Butter Wisely: I learned that avoiding natural peanut butters that separate saves a lot of trouble with texture and keeps your dough from getting too oily.
- Crush Butterfingers Fresh: Crushing the Butterfinger bars by hand right before mixing gives the best crunch and prevents them from getting too powdery or stale.
- Use Parchment Paper When Chilling: This step stops sticking and makes cleanup super easy—trust me, it’s a game changer.
- Avoid Overheating Chocolate: Melting slowly at half power and stirring often keeps chocolate smooth and glossy for the perfect coating every time.
How to Serve Butterfinger Balls: Easy No-Bake Peanut Butter Treats Recipe
Garnishes
I usually stick to extra crushed Butterfinger pieces on top because it really amps up the flavor and texture in every bite. Sometimes I throw on a pinch of coarse sea salt to add that irresistible sweet-and-salty contrast my family loves. For festive occasions, colorful sprinkles can add a fun touch that’s perfect for kids’ parties.
Side Dishes
These butterfinger balls pair perfectly with a tall glass of cold milk or a creamy iced coffee. For a party, I like to serve them alongside fresh fruit or a light yogurt dip to balance the richness. They also make a great sweet finish after a simple meal.
Creative Ways to Present
For special occasions, I arrange them on a decorative platter lined with doilies or festive napkins. Sometimes I package a few in small gift boxes tied with ribbon for edible gifts. Drizzling colors of melted white and dark chocolate over the tops gives a gourmet look that always gets compliments.
Make Ahead and Storage
Storing Leftovers
I keep leftover butterfinger balls in an airtight container in the fridge, where they stay fresh for about a week. Before serving, I let them sit out for 10 minutes to take the chill off so the flavors shine through perfectly.
Freezing
These freeze beautifully! I lay them out on parchment to freeze individually, then transfer to a freezer-safe container. When I’m ready to enjoy, I pull a few out and let them thaw in the fridge overnight. This way, they’re always ready for an impromptu gathering or late-night treat.
Reheating
Since these are no-bake treats, reheating isn’t really necessary. But if you want the chocolate coating a bit softer, a few seconds in the microwave (10-15 seconds) does the trick without melting the whole ball. Just be careful not to warm them too much or they might get too soft to handle.
FAQs
-
Can I use natural peanut butter in Butterfinger Balls?
I recommend sticking to creamy, commercial peanut butter brands like Jif or Skippy for this recipe. Natural peanut butter tends to separate, which can change the texture and make the mixture oily and less firm.
-
How long do Butterfinger Balls last?
Stored in an airtight container in the fridge, these treats stay fresh for up to one week. They can also be frozen for longer storage, up to a month or more.
-
Can I substitute the chocolate coating?
Absolutely! I’ve used milk, dark, and white chocolate with great results. Just be sure to melt the chocolate gently to keep it smooth for dipping.
-
What if my dough is too sticky to roll?
If the dough feels too sticky, chilling it for a bit longer helps—or just wet your hands with water before rolling, which prevents the mixture from sticking and makes shaping easier.
Final Thoughts
Honestly, the Butterfinger Balls: Easy No-Bake Peanut Butter Treats Recipe has become one of my go-to treats whenever I want something quick but guaranteed to impress. It’s as fun to make as it is to eat, and I love sharing them with family and friends because everyone always asks for the recipe. Whether you’re new to no-bake treats or a seasoned pro, give this recipe a try—you’ll end up with a delicious little snack that’s perfect any time you need a pick-me-up!
Print
Butterfinger Balls: Easy No-Bake Peanut Butter Treats Recipe
- Prep Time: 20 minutes
- Cook Time: 0 minutes
- Total Time: 50 minutes
- Yield: 24 balls
- Category: Dessert
- Method: No-Cook
- Cuisine: American
Description
Butterfinger Balls are a quick and easy no-bake treat combining creamy peanut butter, crunchy graham crackers, and crushed Butterfinger candy bars, all coated in smooth melted chocolate. Perfect for festive occasions or a delicious homemade dessert, these bite-sized delights offer a perfect balance of sweetness and crunch with minimal prep time.
Ingredients
Base Ingredients
- 4 tablespoons butter, softened
- 1 teaspoon vanilla extract
- 1 cup peanut butter (avoid all-natural varieties that separate)
Mix-ins
- 1 cup powdered sugar
- 3/4 cup graham cracker crumbs
- 1/2 cup crushed Butterfinger bars
Coating
- 8 ounces chocolate bark or chocolate chips for coating
Optional Toppings
- Extra crushed Butterfinger bars
- Festive sprinkles
- Coarse sea salt for topping
Instructions
- Mix the Base: In a large bowl, use a hand or stand mixer to cream together the peanut butter and softened butter until smooth. Add vanilla extract and mix until fully combined, creating a creamy base mixture.
- Add Sweetness and Crunch: Gradually add powdered sugar at low speed, scraping down the bowl sides as needed to integrate. Fold in graham cracker crumbs and crushed Butterfinger bars evenly, ensuring a consistent texture without overmixing.
- Form the Balls: Line a baking sheet with parchment paper. Using a tablespoon or cookie scoop, portion about 1 to 1½ tablespoons of the mixture and roll them into balls. Place the balls spaced evenly apart on the prepared sheet.
- Chill to Set: Freeze the formed balls for 30 minutes or until they are completely firm, which helps them hold their shape for coating.
- Melt the Chocolate: In a microwave-safe bowl, melt the chocolate bark or chips by heating at 50% power in 30-second intervals, stirring well between each burst until smooth. Take care not to overheat, preventing the chocolate from burning.
- Dip and Decorate: Dip each chilled Butterfinger ball into the melted chocolate, coating fully or halfway depending on preference. Immediately sprinkle with extra crushed Butterfingers, coarse sea salt, or festive sprinkles before the chocolate sets to decorate and add extra texture.
- Let Them Set: Arrange the coated balls on parchment paper and allow the chocolate to harden completely at room temperature or in the refrigerator before serving or storing.
Notes
- Use regular peanut butter (such as Jif or Skippy) for best consistency; natural varieties may separate and affect texture.
- For a deeper chocolate flavor, dark chocolate chips or bark can be used instead of milk chocolate.
- These Butterfinger Balls freeze beautifully, making them an excellent make-ahead treat for holidays or special occasions.
- For visual appeal, try dipping only halfway to create a two-tone look or drizzle additional melted chocolate over the top once set.
Nutrition
- Serving Size: 1 ball (approx. 30g)
- Calories: 140
- Sugar: 12g
- Sodium: 70mg
- Fat: 9g
- Saturated Fat: 4g
- Unsaturated Fat: 4g
- Trans Fat: 0g
- Carbohydrates: 13g
- Fiber: 1g
- Protein: 3g
- Cholesterol: 15mg


