

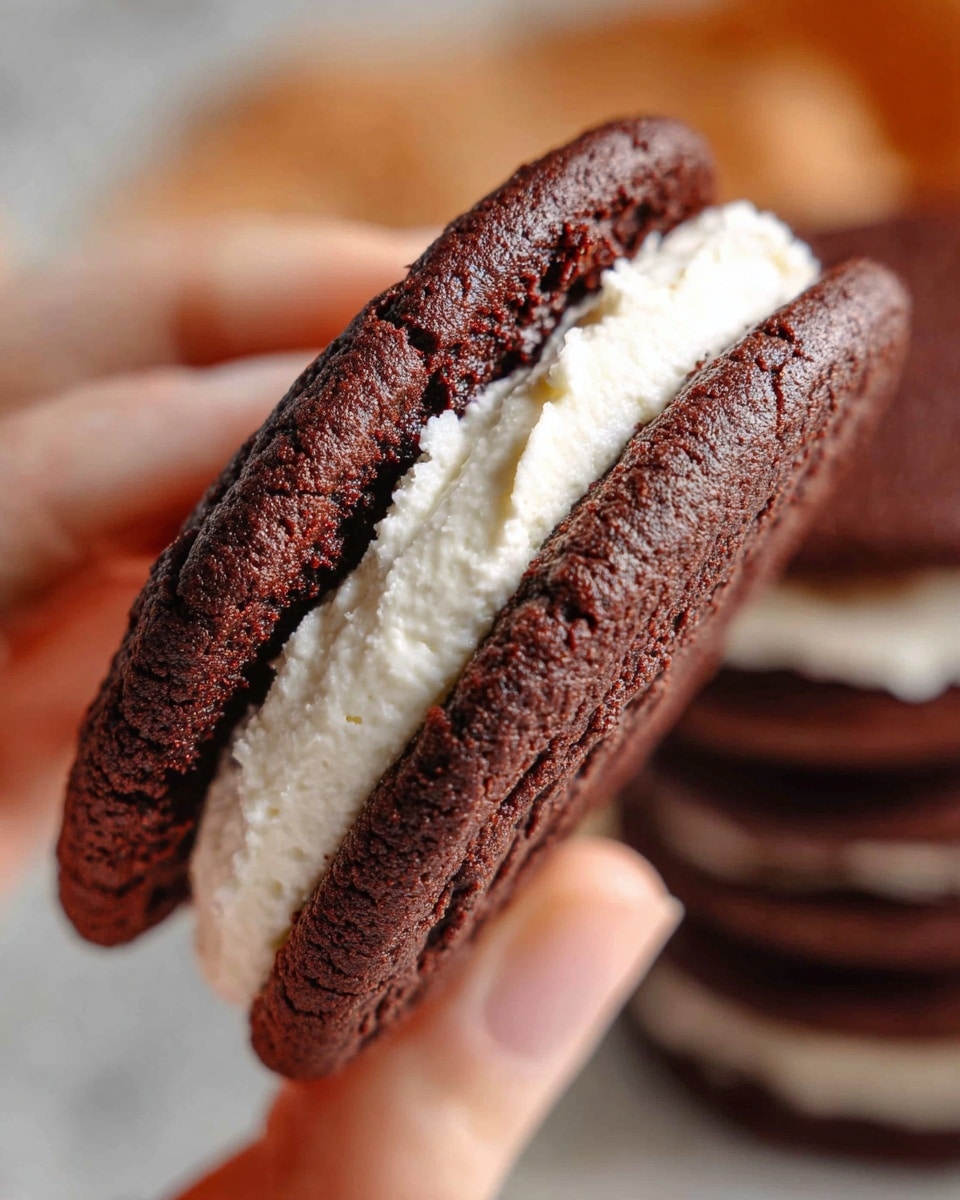
I absolutely love how indulgent and fun these Chocolate Sandwich Cookies Recipe turn out every single time. The cookies have that perfect balance of rich cocoa flavor and a tender, crumbly texture that just melts in your mouth. Whether you’re baking for a cozy night in or a special celebration, these little treats steal the show with their classic sandwich style and homemade charm.
When I first tried this recipe, I was amazed by how straightforward it is – no complicated steps, but the results feel fancy enough to impress. You’ll find that these cookies hold up beautifully whether you fill them with buttercream, cream cheese frosting, or even something adventurous like peanut butter. Trust me, once you make these, the search for the ultimate chocolate sandwich cookie is over!
Why You’ll Love This Recipe
- Incredibly Rich Flavor: A double cocoa combo with black and Dutch-process cocoa packs the punch in every bite.
- Simple Yet Impressive: Even if you’re new to baking, you’ll nail this recipe with straightforward steps.
- Customizable Fillings: Fill with anything from classic buttercream to jam or peanut butter to suit your cravings.
- Perfect Texture: Crispy edges and soft centers that firm up once cooled – just the way a sandwich cookie should be!

Ingredients You’ll Need
These ingredients come together in harmony to create cookies that are both rich and tender. Pro tip: Opt for good quality cocoa powder to maximize flavor — it really makes a difference in this Chocolate Sandwich Cookies Recipe.
- Unsalted butter: Softened butter helps create a tender crumb without making the cookies greasy.
- Vegetable oil: Adds moisture and keeps the cookies soft inside.
- Granulated sugar: Provides sweetness and contributes to a slight crunch on the outside.
- Vanilla extract: Enhances overall flavor with warm, sweet notes.
- Salt: Balances sweetness and intensifies cocoa flavor.
- Egg: Binds ingredients and contributes to the cookie’s structure.
- Cornstarch: This little addition ensures a soft, melt-in-your-mouth texture.
- Black cocoa powder: Gives a deep, dark color and rich chocolate flavor; optional but makes these cookies extra special.
- Dutch-process cocoa powder: Adds complexity and smoothness to the cocoa taste.
- Espresso powder: Just a hint enhances the chocolate without tasting like coffee.
- All-purpose flour: The base of the cookie dough, giving structure and chewiness.
Variations
I like to switch things up often depending on mood and occasion. This Chocolate Sandwich Cookies Recipe is super adaptable, so don’t hesitate to tweak it for gluten-free versions or even vegan adaptations. The best part is making it your own!
- Gluten-Free Version: Swap all-purpose flour for a gluten-free flour blend, and your cookies still come out tender and delicious. I tried this for a friend’s party, and nobody could tell the difference!
- Mint-Flavored Filling: Add a drop of peppermint extract to your filling for a refreshing twist — my family goes crazy for the mint and chocolate combo.
- Nut Butter Filling: Use peanut or almond butter mixed with a little powdered sugar for a creamy center that pairs beautifully with the chocolate shells.
- Cocoa Powder Swap: If black cocoa isn’t available, all regular cocoa works fine; the color is lighter but the taste still amazing.
How to Make Chocolate Sandwich Cookies Recipe
Step 1: Cream the Butter and Sugar Until Fluffy
Start by beating the softened butter, vegetable oil, and sugar in your stand mixer (or by hand if you have the patience!). You want it light and fluffy — usually 3-5 minutes is good. This step is key for that tender texture later. Then, add your vanilla extract and egg, beating until everything is well incorporated and smooth.
Step 2: Combine Dry Ingredients and Mix Gently
In a separate bowl, whisk together the flour, cornstarch, black cocoa, Dutch-process cocoa, espresso powder, and salt. Slowly add these dry ingredients to your wet mixture. I always mix just until combined here—over-mixing can toughen your cookies, and we want them tender!
Step 3: Chill the Dough for Easier Handling
Pop the dough into the fridge for about 20 minutes. I discovered this trick when the dough kept getting too sticky to roll out. This chill time makes it easier to work with, but if you’re in a hurry, it’s okay to skip—just dust your surface with cocoa powder to prevent sticking.
Step 4: Roll Out and Cut Your Cookies
Preheat your oven to 350°F. Roll out the dough to about 1/4 inch thick — working with half at a time helps keep the dough cool. Use your favorite round or scalloped cookie cutter to cut shapes, then transfer to a parchment-lined baking sheet. Be gentle to keep the edges neat!
Step 5: Bake Until Just Set and Fragrant
Bake your cookies for 10-12 minutes. They’ll look soft but will firm up as they cool — this is what you want. I always set a timer and check at 10 minutes to avoid overbaking, which makes the cookies too hard.
Step 6: Cool Completely, Then Sandwich
Let your cookies cool on the baking sheet for a few minutes, then transfer to a wire rack to cool fully. Once cool, pair them up with your filling of choice. The first time I made these, I smushed them together right away and ended up with a melty mess — lesson learned!
Pro Tips for Making Chocolate Sandwich Cookies Recipe
- Keep Dough Cool: Work quickly when rolling out cookies and chill dough as needed to avoid sticking and keep the cookie shape sharp.
- Don’t Overbake: Cookies will look soft when done—pull them out to ensure they stay tender inside.
- Use Black Cocoa for that Intense Dark Color: It’s subtle but really makes your cookies look bakery-quality.
- Match Fillings to Cookie Thickness: If you roll the dough thinner, choose a lighter filling to avoid overwhelming the cookie.
How to Serve Chocolate Sandwich Cookies Recipe
Garnishes
I like to add a light dusting of powdered sugar for a pretty touch right before serving. For holiday occasions, sprinkling a few festive sprinkles or edible glitter on top of the filled cookies adds a lovely sparkle that makes guests smile every time.
Side Dishes
Serve alongside a cold glass of milk, a steaming cup of coffee, or even a scoop of vanilla ice cream. I’ve found that pairing these cookies with a chilled latte really brings out the espresso powder notes beautifully!
Creative Ways to Present
If you’re giving these as gifts or bringing them to a party, stack the sandwich cookies in pretty boxes with parchment paper in between. Another fun idea is to dip half of each sandwich in melted chocolate and sprinkle with chopped nuts or crushed candy canes — my friends go wild for that festive twist.
Make Ahead and Storage
Storing Leftovers
I store leftover cookies in an airtight container at room temperature. They stay fresh for about 4-5 days — the cookie texture holds up nicely and the filling stays perfect. Just be sure the cookies are fully cooled before assembling sandwiches to avoid sogginess.
Freezing
Freezing these cookies works really well either as individual baked cookies or as assembled sandwiches. I like to freeze the cookies separately, then fill them after thawing so the filling doesn’t get too stiff or crumbly when frozen. Wrap them tightly in plastic wrap and freeze up to 3 months.
Reheating
To freshen up leftover cookies, I pop them in the microwave for 10-15 seconds — it revives their soft texture like they’re freshly baked. Avoid reheating assembled cookies with filling, as the filling can melt or become messy. Instead, warm just the cookie part before assembling.
FAQs
-
Can I use regular cocoa powder instead of black cocoa?
Yes! Regular cocoa powder works just fine if you don’t have black cocoa. The cookies won’t be as dark in color, but the chocolate flavor will still be rich and delicious. For best results, use Dutch-process cocoa for a smoother taste.
-
What kind of filling goes best with these cookies?
Traditional choices like buttercream, cream cheese frosting, or chocolate ganache work beautifully. But don’t hesitate to try peanut butter, mint frosting, or even fruit jams. The sturdy yet tender cookie holds up well to a variety of fillings.
-
How do I prevent the cookies from spreading too much in the oven?
Be sure to chill the dough before rolling it out and baking. Also, avoid over-softening the butter before mixing. These steps help keep the cookies from spreading out thin and keep their defined shape.
-
Can I make this recipe vegan?
You can! Substitute the butter for a vegan butter alternative, use flax or chia eggs instead of regular eggs, and select an oil that works for your dietary needs. Just keep an eye on texture since it might need a little adjustment.
Final Thoughts
I still remember the first time I made this Chocolate Sandwich Cookies Recipe—it quickly became a household favorite. There’s something so satisfying about biting into those perfectly chocolaty, tender cookies filled with creamy goodness. I hope you enjoy making (and eating!) these as much as I do, and that they bring a little extra joy to your kitchen and table.
Print
Chocolate Sandwich Cookies Recipe
- Prep Time: 20 minutes
- Cook Time: 12 minutes
- Total Time: 32 minutes
- Yield: 24 sandwich cookies
- Category: Dessert
- Method: Baking
- Cuisine: American
Description
Delight in these rich and chocolatey sandwich cookies with an irresistible cocoa flavor and crisp texture. Perfectly balanced with a hint of espresso to enhance the deep chocolate notes, these cookies are ideal for sandwiching your favorite creamy filling and sharing with friends and family.
Ingredients
Cookie Dough Ingredients
- 1/2 cup (113 grams, 1 stick) unsalted butter
- 1 tablespoon vegetable oil
- 2/3 cup (132 grams) granulated sugar
- 1 teaspoon vanilla extract
- 1/2 teaspoon salt
- 1 egg
- 1/4 cup cornstarch
- 1/4 cup black cocoa powder (or all regular cocoa powder for less intense color)
- 1/4 cup Dutch-process cocoa powder
- 1/2 teaspoon espresso powder
- 1 1/2 cup (180 grams) all-purpose flour
Instructions
- Mix Wet Ingredients: In the bowl of a stand mixer, beat together the butter, vegetable oil, and granulated sugar until the mixture becomes pale and fluffy. Next, add the vanilla extract and egg, beating them in thoroughly to combine well.
- Combine Dry Ingredients: In a separate bowl, whisk together the cornstarch, black cocoa powder, Dutch-process cocoa powder, espresso powder, salt, and all-purpose flour. Gradually add this dry mixture to the wet ingredients and mix just until combined to form a cohesive dough.
- Chill the Dough: Chill the dough in the refrigerator for about 20 minutes. This step isn’t essential for flavor but helps to firm the dough, making it easier to roll out and cut.
- Preheat Oven and Prepare Dough: Preheat your oven to 350°F (177°C). Divide the dough in half and roll out one portion at a time on a surface lightly dusted with cocoa powder to prevent sticking. Roll the dough to about 1/4 inch thickness.
- Cut the Cookies: Using a round or scalloped edge cookie cutter, cut out your cookies and place them spaced out on a baking sheet lined with parchment paper to prevent sticking and allow even baking.
- Bake the Cookies: Bake the cookies for 10 to 12 minutes until they are just set and emit a rich chocolate aroma. They will feel soft when removed; allow them to cool completely on the baking sheet where they will firm up and crisp.
- Cool and Fill: Once the cookies have fully cooled, you can sandwich them with your favorite filling such as buttercream, cream cheese frosting, or chocolate ganache.
Notes
- Using black cocoa powder gives a deep color but can be substituted with all regular cocoa powder for a milder hue.
- Dusting the rolling surface with cocoa powder instead of flour prevents altering the cookie’s color and flavor.
- Chilling the dough is recommended for easier handling but can be skipped if in a rush.
- Store baked cookies in an airtight container at room temperature for up to one week to maintain freshness.
- Experiment with different fillings like vanilla buttercream, peanut butter, or salted caramel for variety.
Nutrition
- Serving Size: 2 cookies (about 30 grams)
- Calories: 160
- Sugar: 11 g
- Sodium: 70 mg
- Fat: 8 g
- Saturated Fat: 5 g
- Unsaturated Fat: 2 g
- Trans Fat: 0 g
- Carbohydrates: 20 g
- Fiber: 2 g
- Protein: 2 g
- Cholesterol: 25 mg


