

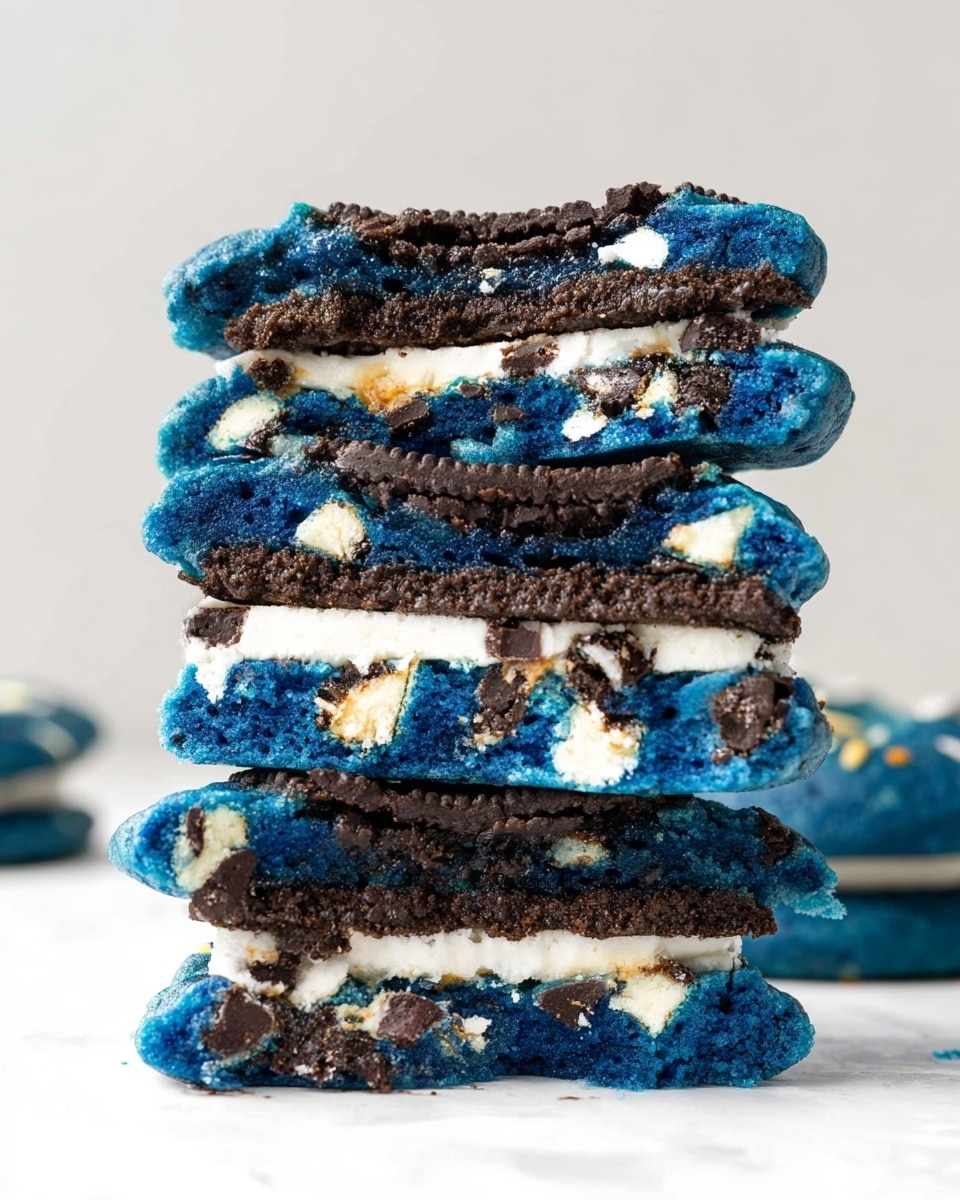
If you love cookies that bring a smile to everyone’s face, you absolutely have to try this Cookie Monster Cookies with Stuffed Chocolate and Cookie Fillings Recipe. It’s one of those treats that looks as fun as it tastes, with its vibrant blue dough and ooey-gooey chocolate or whole cookie center that melts in your mouth. I love this recipe because it combines that classic chewy cookie texture with a surprising, stuffed twist that makes every bite unforgettable.
Whenever I bake these, they’re perfect for sharing at parties or just enjoying as an indulgent weekend treat. You’ll find that these cookies are not only delightful to eat but also pretty fun to make — stuffing them with your favorite chocolates or cookies brings out your creativity and makes the process joyful. This Cookie Monster Cookies with Stuffed Chocolate and Cookie Fillings Recipe is truly worth trying if you want a show-stopping dessert that suits both kids and adults.
Why You’ll Love This Recipe
- Eye-Catching and Fun: The bright blue dough and candy eyeballs make these cookies instantly delightful and kid-approved.
- Stuffed Surprises: Filled with gooey chocolate or whole cookies, every bite offers a decadent, tasty surprise.
- Chewy and Thick Texture: Using bread flour adds a chewy, thick bite that’s perfect for holding the fillings without falling apart.
- Customizable: You can easily switch up the fillings to your favorite chocolates or cookies, making them your own.

Ingredients You’ll Need
This recipe strikes a delicious balance between rich cookie dough and crunchy mix-ins. I find that bread flour works wonderfully here, giving the perfect chew, but all-purpose flour works if that’s what you have on hand.
- Butter: Softened butter creates the rich, tender base that helps the dough come together smoothly.
- Brown Sugar: Adds moisture and depth of flavor with a subtle molasses note that complements the chocolate well.
- Granulated Sugar: Helps with the structure and adds sweetness to balance the brown sugar.
- Vanilla Extract: An essential for flavorful cookies—you’ll want to use pure vanilla for the best results.
- Eggs: They bind everything together and add richness to the dough.
- Royal Blue Gel Food Coloring: Concentrated and vibrant, this gel coloring gives the iconic Cookie Monster blue color without watering down your dough.
- Bread Flour or All-Purpose Flour: Bread flour gives extra chewiness, but all-purpose is an equally tasty substitute.
- Baking Powder and Baking Soda: Both help the cookies rise and achieve that soft, pillowy texture.
- Salt: Balances the sweetness and enhances all the flavors.
- Crushed Cookies: I love mixing Oreos and Chips Ahoy for that perfect crunch and flavor variance.
- White and Milk Chocolate Chips: Adds pockets of melty sweetness throughout.
- Milk Chocolate Bars or Whole Cookies for Stuffing: These become the delightful center surprises—choose your favorite brands!
- Candy Eyeballs: For that whimsical finishing touch, making these cookies truly look alive.
Variations
This recipe is so fun to adapt! I encourage you to make it your own by swapping fillings or adding mix-ins that suit your tastes. That’s what keeps me coming back to it — there’s always room to experiment.
- Chocolate Lovers’ Twist: Try stuffing these cookies with peanut butter cups or caramel-filled chocolates for extra indulgence—I’ve done it, and my family goes crazy for it.
- Nut-Free Version: Stick to chocolate and cookie fillings without nuts to make these kid-friendly, which is something I often adapt for school events.
- Smaller Bites: Use a smaller scoop and mini cookies for bite-size monsters — perfect for parties or lunchbox treats.
- Natural Coloring: If you want a natural alternative, try butterfly pea flower powder for a lovely blue hue; it worked well for me when I couldn’t find gel coloring.
How to Make Cookie Monster Cookies with Stuffed Chocolate and Cookie Fillings Recipe
Step 1: Cream the Butters and Sugars Until Fluffy
Start off by combining the softened butter, brown sugar, and granulated sugar with the vanilla extract in your mixer. Beat this mixture on medium speed for about 6 to 8 minutes until it’s light and fluffy—a crucial step that really sets the texture of your cookie. I usually pause halfway to scrape the bowl to make sure everything gets mixed evenly.
Step 2: Add Eggs and Blue Food Coloring
Add the eggs one at a time, mixing well between each addition so your dough stays smooth and cohesive. Then mix in the royal blue gel food coloring until you get that vivid Cookie Monster shade. A little tip: gel coloring is much more concentrated, so start with less—you can always add more.
Step 3: Mix in Dry Ingredients
With the mixer turned off, sift the flour, baking powder, baking soda, and salt over the wet batter, or whisk them together separately and add it all in. Then blend on low speed just until everything is incorporated—don’t overmix, or the cookies might turn out tough. The bread flour here helps create that chewy texture we love.
Step 4: Fold in Crushed Cookies and Chocolate Chips
Now stir in your crushed Oreos and Chips Ahoy cookies along with both white and milk chocolate chips. This adds both texture and pockets of melty sweetness throughout. I love how the cookies give a little crunch to balance the soft dough.
Step 5: Assemble and Stuff the Cookie Dough
Use a large cookie scoop (about 2 tablespoons) to portion out 12 balls of dough. Flatten each ball slightly and place a piece of milk chocolate bar or a whole cookie in the center. Then top with another scoop of dough and gently press the edges to seal the filling inside. The sealing step is key to avoid chocolate or cookie peeking out or leaking when baking.
Step 6: Add Crunchy Toppings and Candy Eyes
Press some extra crushed cookies and chocolate chips onto the tops for that fabulous texture and finish off by adding a couple of candy eyeballs to capture that Cookie Monster vibe. This little detail always brings a fun smile from everyone who sees these.
Step 7: Chill and Bake
Pop the cookie dough balls into the fridge for at least 3 hours—this chilling step is essential to prevent spreading and helps the flavors meld. When ready, preheat your oven to 350°F and line baking sheets with parchment paper. Arrange the cookies about 2 inches apart. Bake the smaller treats for 10 to 12 minutes or the larger ones for about 20 to 22 minutes, one tray at a time.
Once baked, let them cool on their sheet for 10 minutes before transferring to a wire rack. This keeps them nice and soft inside while the outside firms up just right.
Pro Tips for Making Cookie Monster Cookies with Stuffed Chocolate and Cookie Fillings Recipe
- Use Bread Flour for Chewiness: I learned this from trial and error — bread flour creates a delightfully chewy texture that stands up well to the fillings.
- Chill Dough Thoroughly: Don’t skip the 3-hour chill; it helps the cookies hold their shape and lets the flavors develop deeply.
- Seal the Edges Carefully: Pinching the dough well around the filling prevents leaks and keeps the surprise hidden until you bite in.
- Don’t Overbake: Watch closely in the last few minutes—the cookies should be set but still soft to enjoy that chewy, melty center.
How to Serve Cookie Monster Cookies with Stuffed Chocolate and Cookie Fillings Recipe
Garnishes
I keep it simple with extra crushed cookies and those classic candy eyeballs for the ultimate Cookie Monster charm. For parties, I sometimes sprinkle edible glitter or colored sugar to make them even more festive, and my kids love the sparkle.
Side Dishes
Pair these sweet cookies with a cold glass of milk, a scoop of vanilla ice cream, or a cup of hot coffee for the grown-ups. I especially enjoy the combo with a scoop of homemade vanilla bean ice cream—it balances the sweetness beautifully.
Creative Ways to Present
For birthdays or themed parties, I arrange these cookies on a bright blue platter surrounded by monster-themed decorations. You can even stack smaller cookies into a “cookie monster tower” or use cupcake liners to keep them from sticking together—fun ideas to make your treats stand out!
Make Ahead and Storage
Storing Leftovers
I store leftover cookies in an airtight container at room temperature, and they stay soft and delicious for about 3-4 days. Placing a slice of bread inside the container helps keep them moist—this little trick never fails me.
Freezing
If I’m prepping ahead, I freeze the assembled but unbaked stuffed cookie dough balls on a tray and then transfer them to a freezer bag after they’re firm. This way, you can bake fresh Cookie Monster Cookies whenever you want—add a couple extra minutes to baking time when frozen.
Reheating
To reheat, I pop the cookies in a warm oven (about 300°F) for 5-7 minutes just until warmed through; this helps revive the melty center and the cookie’s chewy texture without drying them out.
FAQs
-
Can I use regular liquid food coloring instead of gel for the Cookie Monster Cookies with Stuffed Chocolate and Cookie Fillings Recipe?
Yes, you can substitute liquid food coloring, but since it’s less concentrated, you’ll need to use about twice as much to get that vibrant blue color. Keep in mind, adding too much liquid food coloring can slightly alter the dough’s consistency, so add gradually and monitor your dough’s texture.
-
What type of flour is best for these cookies?
Bread flour is my top pick because it gives the cookies a denser and chewier texture that nicely holds the fillings. However, all-purpose flour works just fine if that’s what you have; the cookies will be a bit softer but still delicious.
-
How do I prevent the chocolate or cookie filling from leaking out while baking?
Make sure to pinch the edges of the dough tightly around your filling so it’s completely sealed. Chilling the dough balls before baking also helps the dough hold together and minimizes leaks during baking.
-
Can I prepare the cookie dough ahead of time?
Definitely! You can make the cookie dough or even assemble the stuffed cookies and keep them refrigerated for up to one week before baking. Just make sure to cover them well to prevent drying out.
-
What fillings can I use besides chocolate and whole cookies?
Get creative! Try peanut butter cups, caramel squares, mini brownies, or even jam-filled chocolates—the possibilities are endless and will make each batch unique and fun.
Final Thoughts
I truly adore this Cookie Monster Cookies with Stuffed Chocolate and Cookie Fillings Recipe because it’s more than just a cookie—it’s an experience. Every time I make them, from mixing in the blue dough to sealing the hidden treats, it feels like a little culinary adventure. I know you’ll enjoy sharing this recipe with your family and friends, and once you try it, it might just become your go-to fun cookie recipe for celebrations and cozy days alike. Give it a go, and don’t forget to sneak a warm one straight out of the oven!
Print
Cookie Monster Cookies with Stuffed Chocolate and Cookie Fillings Recipe
- Prep Time: 20 minutes
- Cook Time: 20 minutes
- Total Time: 40 minutes
- Yield: 10 to 12 large cookies
- Category: Dessert
- Method: Baking
- Cuisine: American
Description
Cookie Monster Cookies are deliciously soft, chewy cookies stuffed with either milk chocolate squares or whole cookies like Oreos, with a fun blue tint and playful candy eyeballs on top. These indulgent treats combine the richness of brown and granulated sugars, the crunch of crushed cookies, and the melty goodness of chocolate chips, making them perfect for any cookie lover looking for a creative twist.
Ingredients
Cookie Dough
- 1/2 cup butter, softened
- 1/2 cup brown sugar, packed (105 grams)
- 1/2 cup granulated sugar (100 grams)
- 2 teaspoons vanilla extract
- 2 large eggs
- 1/2 teaspoon Royal Blue gel food coloring
- 2 1/3 cups bread flour, or all-purpose flour (280 grams)
- 1 3/4 teaspoons baking powder
- 1 teaspoon baking soda
- 1 teaspoon salt
- 1 cup crushed cookies (Oreos and Chips Ahoy suggested)
- 1/2 cup white chocolate chips
- 1/2 cup milk chocolate chips
Stuffing
- 2 milk chocolate bars, cut into squares
- 12 whole cookies (Oreos, Samoas, Chips Ahoy)
Topping
- 1/2 cup crushed cookies
- Candy eyeballs
Instructions
- Prepare the dough base: In a large mixing bowl, combine the softened butter, brown sugar, granulated sugar, and vanilla extract. Beat on medium speed for 6 to 8 minutes until the mixture is soft and fluffy, pausing halfway to scrape down the bowl to ensure even mixing.
- Add eggs and coloring: Add eggs one at a time, beating well after each addition. Then mix in the Royal Blue gel food coloring until the dough is evenly tinted.
- Mix dry ingredients: Sift the flour, baking powder, baking soda, and salt over the bowl with the batter. Alternatively, whisk these dry ingredients separately and then incorporate them. Mix on low speed until well combined.
- Add mix-ins: Fold in the crushed cookies, white chocolate chips, and milk chocolate chips gently to distribute them throughout the dough.
- Form stuffed dough balls: Using a large cookie scoop (about 2 tablespoons), scoop 12 dough balls. Flatten each ball and place a piece of milk chocolate or a whole cookie in the center. For smaller cookies, use 1 tablespoon scoops and smaller cookies for stuffing.
- Seal the cookies: Scoop more dough and cover the stuffing, pressing the dough edges to seal completely. Press additional crushed cookies and chocolate chips on top, then add two candy eyeballs per cookie for decoration.
- Chill the dough: Refrigerate the stuffed cookie dough balls for at least 3 hours to firm up before baking.
- Preheat and prepare for baking: Preheat oven to 350°F (175°C). Line baking sheets with parchment paper.
- Bake the cookies: Arrange cookie dough balls 2 inches apart on the prepared baking sheets. Bake smaller cookies for 10 to 12 minutes, and larger cookies for 20 to 22 minutes, one tray at a time.
- Cool the cookies: Let cookies cool on the baking sheet for 10 minutes, then transfer to a wire rack to cool completely or enjoy warm.
Notes
- Using bread flour results in denser, thicker, and chewier cookies compared to all-purpose flour.
- A #30 cookie scoop holds approximately 2 tablespoons of dough, which is ideal for larger cookies.
- Gel food coloring is more concentrated than liquid food coloring; found online or at craft stores, especially in cake decorating sections.
- If gel coloring is unavailable, use twice the amount of regular liquid food coloring as a substitute.
- For a natural color alternative, try Butterfly Pea Flower powder.
- You can store raw dough or assembled stuffed dough balls refrigerated for up to one week before baking.
- Stuff cookies with milk chocolate squares or crisp cookies like Oreos, Nutter Butter, Chips Ahoy, Samoas, or even brownie pieces for variety.
- Cookies taste best warm, especially when stuffed with milk chocolate, allowing melted chocolate to ooze out.
Nutrition
- Serving Size: 1 cookie
- Calories: 367 kcal
- Sugar: 24 g
- Sodium: 301 mg
- Fat: 15 g
- Saturated Fat: 7 g
- Unsaturated Fat: 7 g
- Trans Fat: 0 g
- Carbohydrates: 52 g
- Fiber: 1 g
- Protein: 6 g
- Cholesterol: 30 mg


