

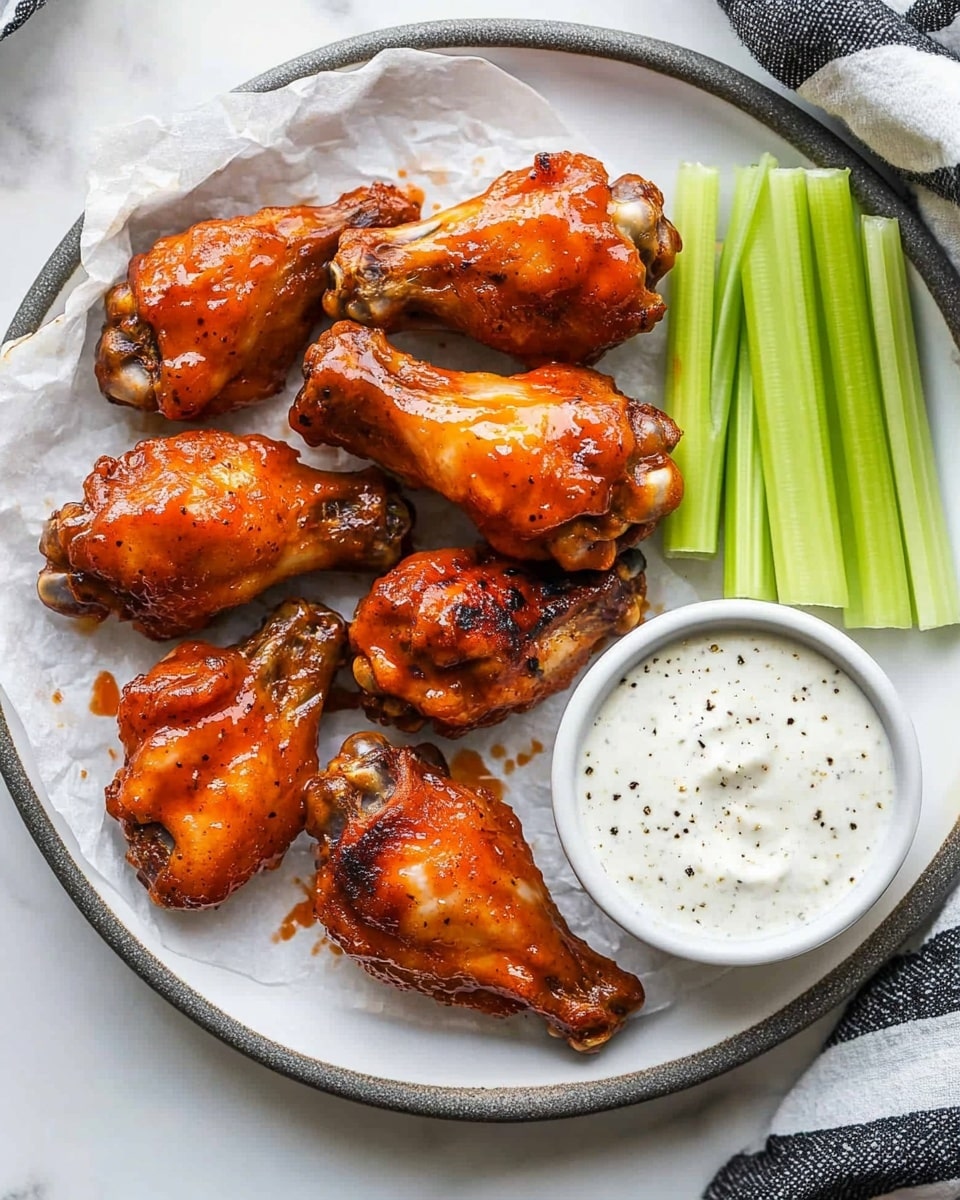
I absolutely love whipping up this Crispy Baked Chicken Wings Recipe whenever I want a fail-proof, crowd-pleasing snack that’s lighter than fried but still hits that crispy, flavorful note. When I first tried baking wings instead of frying, I was skeptical, but this recipe totally converted me because it gives me that crave-worthy crunch without the mess or heaviness of oil. You’ll find that it works perfectly for casual game days, family dinners, or even when you’re just craving something savory and satisfying on a weeknight.
What makes this Crispy Baked Chicken Wings Recipe so special is how easy it is to pull together with simple pantry staples and how customizable the seasoning is to your taste. I love that you don’t need fancy equipment or complicated steps, just some butter, a few spices, and a hot oven. Plus, baking on racks helps the wings get perfectly crispy all over, which means you don’t miss a thing compared to traditional frying.
Why You’ll Love This Recipe
- Simple Ingredients: Uses common pantry staples you probably already have, making it easy to make anytime.
- Healthier Crispy Alternative: Achieves that coveted crunch without deep frying or excess oil.
- Versatile and Customizable: You can adjust spices or dipping sauces to suit your family’s flavor preferences.
- Consistent Results: Baking on wire racks ensures even cooking and crispiness every single time.

Ingredients You’ll Need
The ingredients for this Crispy Baked Chicken Wings Recipe are straightforward, but each one plays an important role in building flavor and texture. I recommend opting for fresh wings and good-quality butter to really make the seasoning shine.
- Chicken Wings: Look for fresh or thawed wings split at the joints with tips removed — this helps them cook evenly and crispen up wonderfully.
- Butter: Melted butter coats the wings perfectly, helping spices stick and creating a golden color; you can substitute with olive oil if you prefer.
- Kosher Salt: Essential for seasoning — Diamond Crystal works great, but any good salt will do; be mindful to adjust quantities with different brands.
- Black Pepper: Adds subtle heat and depth, balancing out the richness.
- Garlic Powder: A flavor enhancer that pairs beautifully with chicken wings — I always keep it on hand.
- Paprika: Provides mild smokiness and beautiful color — smoked paprika adds an extra layer of flavor if you’re feeling adventurous.
Variations
One of the things I love about this Crispy Baked Chicken Wings Recipe is how easy it is to switch things up based on what you have or what mood you’re in. Feel free to experiment with different spices or heat levels to make it your own.
- Buffalo Style: After baking, toss the wings in a homemade buffalo sauce made with melted butter and hot sauce — my go-to for game nights that my family goes crazy for!
- Spicy Kick: Add cayenne pepper or chili powder to the seasoning mix if you like things with an extra punch; just adjust to your heat tolerance.
- Herbed Wings: Sprinkle some dried rosemary, thyme, or oregano for a fresh, aromatic twist I’ve found works great for casual dinners.
- Whole Wings: This recipe works just as well with whole wings if you want to keep things simple — just add a few extra minutes to cooking time.
How to Make Crispy Baked Chicken Wings Recipe
Step 1: Preheat and Prep Your Baking Station
Start by preheating your oven to 400°F — this high heat is key to crisping the skin. Line two rimmed baking sheets with foil for easy cleanup, then place wire racks on top. I really can’t stress enough how much placing the wings on racks helps with airflow and even cooking, so don’t skip this step. It keeps the wings elevated so they crisp underneath instead of steaming in their own juices.
Step 2: Toss Wings with Butter and Seasonings
In a large bowl, toss the chicken wings with melted butter until they’re all evenly coated. This helps the seasoning stick and promotes browning while baking. Then sprinkle with kosher salt, black pepper, garlic powder, and paprika, tossing again to make sure every wing is well-seasoned. When I do this, I gently pat the wings with my hands to ensure the spices stick well but don’t get clumpy.
Step 3: Arrange Wings and Bake
Lay the wings out in a single layer on the prepared wire racks; crowding them will cause steaming instead of crisping. Bake in the preheated oven for around 40 minutes — you’ll want to check for a deep golden-brown color and that classic crispy texture. If you want to take it a step further, I discovered that lowering the oven temperature to 170°F after the initial bake and slowly drying them out for another 30-40 minutes really amps up the crispiness without drying the meat.
Step 4: Serve Hot with Dipping Sauces
Once the wings come out of the oven, serve them immediately for the best crunch. Blue cheese and ranch dressing are classic accompaniments, but I often like to mix things up with honey mustard or even a kicky sriracha mayo. Your family or guests will thank you!
Pro Tips for Making Crispy Baked Chicken Wings Recipe
- Use Wire Racks: Elevating wings on racks lets air circulate all around, giving you even crispiness that’s hard to get with just a baking sheet.
- Pat Wings Dry Before Baking: Moisture is the enemy of crispiness — I always pat my wings with paper towels before tossing them in butter.
- Don’t Crowd the Pan: Give each wing some breathing room so it crisps up instead of steaming — leaving space is a game changer.
- Customize the Heat: Start with mild paprika, then add cayenne or smoked paprika for layers of flavor instead of overpowering the wings.
How to Serve Crispy Baked Chicken Wings Recipe
Garnishes
I love garnishing my crispy baked wings with freshly chopped parsley or chives — it adds a pop of color and fresh brightness that contrasts the rich, crispy skin. A squeeze of lemon juice over the top before serving can also brighten the flavors and cut through the richness, which I always appreciate.
Side Dishes
This Crispy Baked Chicken Wings Recipe pairs beautifully with crunchy celery sticks and carrot batons, plus your favorite dipping sauces like blue cheese or ranch. I’ve also served it alongside classic fries or a crisp green salad to balance the meal. For a heartier option, mashed potatoes or coleslaw work wonders too.
Creative Ways to Present
Whenever I’m throwing a party, I like to serve these wings stacked in a rustic wooden bowl lined with parchment paper for a casual vibe. You can also skewer the wings on sticks for easy grab-and-go finger food at gatherings. For a fun twist, arrange them on a platter with different dipping sauces in small bowls around for guests to explore flavors.
Make Ahead and Storage
Storing Leftovers
If you have leftovers (which is rarer than you’d think), store them in an airtight container in the fridge for up to 3-4 days. I find it best to line the container with paper towels to absorb excess moisture — that way, the wings don’t turn soggy overnight.
Freezing
I’ve frozen cooked wings successfully by letting them cool completely, then placing them in freezer bags with as much air removed as possible. They keep well for up to three months and thaw nicely in the fridge overnight before reheating.
Reheating
To bring back that crispy magic when reheating, I always use the oven set to 350°F. Spread wings out on a wire rack or baking sheet and heat for about 10-15 minutes until warmed through and crispy again. This method keeps the skin crunchy better than the microwave ever could.
FAQs
-
Can I make this Crispy Baked Chicken Wings Recipe without butter?
Absolutely! You can substitute melted butter with olive oil or even avocado oil for a slightly different flavor and a bit of extra health benefits. The oil helps the seasonings stick and promotes browning, so your wings still turn out crispy and delicious.
-
How do I ensure my baked wings come out crispy?
Patting the wings dry before seasoning, baking on wire racks to allow air circulation, avoiding overcrowding on the baking sheet, and baking at a high temperature are the keys to crispy wings. For extra crispiness, finishing them at a lower temperature for longer helps remove lingering moisture.
-
Can I use this recipe for whole wings instead of split wings?
Yes, this recipe works well with whole wings too. Just keep in mind you might need to increase the baking time slightly to ensure they cook through and crisp up evenly.
-
Is it okay to freeze cooked wings made with this recipe?
Definitely! Cooked wings freeze nicely. Just let them cool completely before freezing in airtight bags. Thaw in the fridge overnight before reheating to enjoy nearly fresh-tasting wings again.
Final Thoughts
I hope you’ll give this Crispy Baked Chicken Wings Recipe a try soon — it’s truly one of my favorite ways to enjoy wings without the fuss of frying. I used to struggle getting wings crispy in the oven until I nailed this simple technique, and now it’s a go-to whenever I want something delicious that feels a little bit special but isn’t complicated. Trust me, once you taste how crispy and flavorful these baked wings turn out, they might just become your new snack obsession!
Print
Crispy Baked Chicken Wings Recipe
- Prep Time: 15 minutes
- Cook Time: 40 minutes
- Total Time: 55 minutes
- Yield: 4 servings
- Category: Appetizer
- Method: Baking
- Cuisine: American
Description
Crispy Baked Chicken Wings are a perfect appetizer or snack, featuring tender and juicy wings coated in a flavorful blend of butter, garlic, paprika, and kosher salt, then baked to golden perfection for a satisfying crunch without deep frying.
Ingredients
Chicken Wings
- 3 pounds chicken wings, split, tips removed
Seasoning
- 2 tablespoons butter, melted
- 2 teaspoons Diamond Crystal kosher salt (or 1 teaspoon of any other salt)
- 1/2 teaspoon black pepper
- 1 teaspoon garlic powder
- 1 teaspoon paprika (or smoked paprika)
Instructions
- Preheat the Oven: Preheat the oven to 400°F (204°C). Line two rimmed baking sheets with foil and place wire racks on top to allow air circulation around the wings for even cooking.
- Coat Wings: In a large bowl, toss the chicken wings with melted butter until well coated. Arrange the wings evenly on the wire racks placed on the baking sheets. Sprinkle the wings with kosher salt, black pepper, garlic powder, and paprika to season thoroughly.
- Bake: Bake the wings in the preheated oven for about 40 minutes or until they are nicely browned and crispy on the outside. For extra crispiness, reduce the oven temperature to 170°F (77°C) after initial baking and continue baking for a longer time to dry out the skin further.
- Serve: Remove the wings from the oven and serve hot. They pair wonderfully with blue cheese or ranch dressing for dipping.
Notes
- You can substitute butter with olive oil spray for a lighter option.
- This recipe works well with whole wings if preferred.
- Adjust cooking time depending on your oven’s temperature accuracy.
- Store leftovers in the fridge for 3-4 days, and reheat in a 350°F oven for best results.
- Cooked wings can be frozen in bags for up to three months. Thaw in the fridge before reheating.


