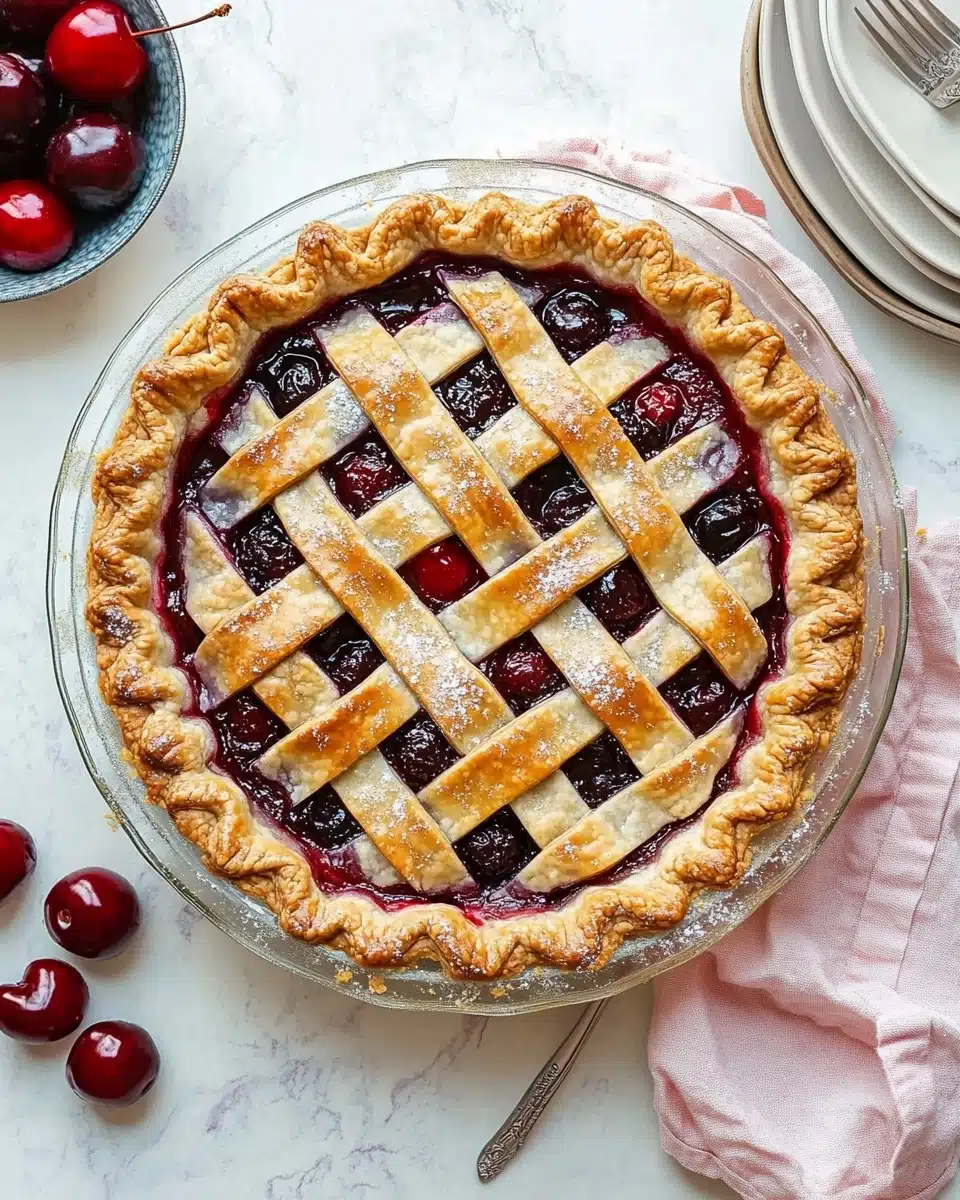
If you’re ready to bring a true showstopper to your dessert table, you simply can’t beat this Homemade Cherry Pie Recipe. With a flaky, buttery crust and a juicy filling that bursts with real cherry flavor in every bite, this pie is as delicious as it is beautiful. Whether you’re celebrating a special occasion or simply want to treat yourself, this classic homemade cherry pie recipe is truly irresistible!
Why You’ll Love This Recipe
- Jam-Packed with Real Fruit: Every forkful overflows with plump, juicy cherries and pure, fresh flavor.
- Homemade Flaky Crust: The all-butter crust comes out golden and flaky, perfectly complementing the sweet-tart cherry filling.
- Easy to Customize: Use your favorite cherries—dark sweet, Rainier, or even a mix—and adapt the filling for your tastebuds.
- Show-Stopping Appearance: The classic lattice top makes your homemade cherry pie recipe look straight out of a bakery window.

Ingredients You’ll Need
This homemade cherry pie recipe uses just a handful of essential ingredients to highlight the vibrant color and robust flavor of real cherries. Each component, from the buttery crust to the bright lemon juice, plays a starring role in making this pie a true classic you’ll crave again and again.
- Homemade Pie Crust or All Butter Pie Crust: The rich, flaky base and top for your pie—worth every minute, and much tastier than store-bought!
- Fresh Cherries: You’ll want about 4½ cups, halved and quartered for the perfect mix of texture; use sweet, Rainier, sour, or even frozen cherries.
- Granulated Sugar: Balances the tartness of the cherries and helps create a luscious, syrupy filling.
- Cornstarch: The magic behind that thick, glossy cherry pie filling—no watery pies here.
- Lemon Juice: Brightens up the flavors and cuts the sweetness for a balanced bite every time.
- Vanilla Extract: Adds a rich depth of flavor that rounds out the cherry goodness.
- Almond Extract: Just a hint gives the filling that classic “bakery pie” scent—don’t skip it!
- Cold Unsalted Butter: Dotted on top for flavor and an extra silky finish to the filling.
- Egg Wash (Egg + Milk): Brushes on a golden, shiny finish and a little crunch to the lattice or top crust.
- Coarse Sugar (optional): Adds sparkle and the perfect crunchy topping if you want to show off.
Variations
One of the wonderful things about a homemade cherry pie recipe is how easily you can make it your own! Whether you’re adjusting for what’s in the fridge, considering dietary needs, or chasing a unique twist, there’s plenty of space to get creative.
- Mixed Berry Cherry Pie: Add a couple handfuls of blueberries or raspberries for a deeper berry flavor and stunning color contrast.
- Gluten-Free Pie: Make the crust using your favorite gluten-free flour blend—just be sure your cornstarch is also gluten-free.
- Use Frozen Cherries: No fresh cherries on hand? Frozen work beautifully—halve or quarter while still frozen and follow all the same steps.
- Spiced Cherry Pie: Stir in a pinch of cinnamon or nutmeg to warm up the filling, especially around the holidays.
How to Make Homemade Cherry Pie Recipe
Step 1: Prepare and Chill Your Pie Dough
Begin by whipping up your homemade pie crust (or all-butter pie crust, if you want maximum flakiness!). Once your dough is ready, it’s crucial to let it chill in the refrigerator for at least two hours. This step is essential for easy rolling and that tender, flaky texture—don’t rush it!
Step 2: Make the Cherry Filling
In a big bowl, combine your pitted, halved, and quartered cherries with granulated sugar, cornstarch, lemon juice, vanilla, and a whisper of almond extract. Give it a gentle stir so every cherry gets coated and glossy. Cover, and chill the filling while you roll out the crust—the flavors will mingle while you work.
Step 3: Roll Out and Fill the Bottom Crust
Dust your counter with flour and roll out one dough disc to a 12-inch circle. Carefully nestle it into your 9-inch pie dish, gently tucking the corners in for that homey look. Use a slotted spoon to scoop in your cherries, and set aside those amazing juices—they’re about to become the secret ingredient!
Step 4: Reduce the Cherry Juices
Pour the reserved cherry juice into a small saucepan and cook over low heat for 3–4 minutes, stirring until it thickens slightly and turns syrupy. Let it cool a few minutes, then drizzle over the cherries in the crust—it will set into delicious pockets of flavor. Dot those tiny, cold butter cubes all over the filling for extra richness.
Step 5: Lattice the Top Crust
Roll out your second crust, cut it into strips, and weave a lovely lattice. Don’t stress if it’s not perfect—rustic is charming! Press the edges to seal, then trim any overhanging dough with kitchen shears. Give the whole edge a pretty flute or crimp, then pop the pie into the fridge to chill (this ensures the crust holds its shape while baking).
Step 6: Egg Wash, Sugar, and Bake!
Brush the lattice with egg wash and sprinkle with coarse sugar for that irresistible golden crunch. Bake at 400°F (204°C) for 20 minutes, then lower to 375°F (190°C) and continue for another 30–40 minutes. If the outer crust browns too quickly, tent it with a pie shield or foil. You’ll know your homemade cherry pie recipe is done when the juices are bubbling and the crust is beautifully golden.
Step 7: Cool Before Serving
This is where the magic happens! Let your cherry pie cool for at least 3–4 hours before slicing. The filling will set perfectly, giving you those picture-worthy slices with plenty of thick, ruby-red fruit in every bite.
Pro Tips for Making Homemade Cherry Pie Recipe
- Chilled Dough is Key: Cold pie dough is easier to handle and helps your crust bake up extra flaky, so keep everything as cool as possible up until baking.
- Use a Slotted Spoon: When adding the cherry filling to the crust, a slotted spoon helps you leave excess liquid behind and prevents a soggy bottom.
- Reduce the Juices: Don’t skip simmering the cherry juice—this concentrates flavor and thickens the filling for slices that hold together beautifully.
- Protect the Edges: For picture-perfect results, add a pie shield or foil to the outer crust halfway through baking to prevent over-browning.
How to Serve Homemade Cherry Pie Recipe

Garnishes
A scoop of vanilla ice cream is absolutely dreamy with this homemade cherry pie recipe, but don’t stop there—try a cloud of barely sweetened whipped cream or a dusting of powdered sugar for an elegant finish. A sprinkle of toasted sliced almonds delivers just the right crunch and a subtle nod to the almond extract in the filling.
Side Dishes
This cherry pie plays well with a brunch spread, especially alongside fresh fruit salads or a platter of sharp cheeses. For an after-dinner treat, pair it with a cup of strong coffee or a mug of hot tea to perfectly balance the pie’s sweetness.
Creative Ways to Present
Go the extra mile by cutting your lattice crust into fun shapes with cookie cutters or braiding the strips for a truly show-stopping top. Serve individual mini pies for picnics or parties, or stack classic pie slices with a drizzle of cherry syrup for a modern, deconstructed dessert plate.
Make Ahead and Storage
Storing Leftovers
Leftover cherry pie stores beautifully! Just cover tightly with foil or plastic wrap and keep in the refrigerator for up to five days. The flavors meld together even more, making each slice taste somehow better than the last.
Freezing
This homemade cherry pie recipe is freezer-friendly in so many ways. You can freeze the baked pie, the unbaked crust, or even the prepared cherry filling for up to three months—just be sure to wrap securely to prevent freezer burn. Thaw overnight in the refrigerator when you’re ready to enjoy.
Reheating
To bring back that just-baked magic, warm leftover slices in a 300°F (150°C) oven for about 10 minutes. This keeps the crust crisp and the filling luscious. And yes, it’s totally acceptable to add a fresh scoop of ice cream every time!
FAQs
-
Can I make the cherry pie filling ahead of time?
Absolutely! Mix the cherries with the sugar, cornstarch, and extracts, then refrigerate the filling for up to 24 hours. You can also freeze the prepared filling (with juices) for up to three months—thaw overnight in the fridge before using.
-
What type of cherries work best for this homemade cherry pie recipe?
You can use any variety you love—dark sweet, Rainier, or tart/sour cherries (just increase the sugar if using sour varieties). Even frozen cherries will work in a pinch and provide amazing results!
-
How do I prevent the bottom crust from getting soggy?
Make sure to use a slotted spoon when adding the cherry filling to the crust and don’t skip reducing the reserved juices. Chilling the assembled pie before baking also helps set the crust and keep it crisp.
-
Why do I have to let homemade cherry pie cool before slicing?
The pie filling needs time to set up and thicken as it cools, which means you’ll get beautiful, tidy slices instead of a runny mess. Resist the urge to cut in early—your patience will pay off!
Final Thoughts
If you’ve been searching for a sweet, shareable treat that feels as special as it tastes, this homemade cherry pie recipe is your perfect pick. It’s the kind of dessert that brings people together, makes memories, and fills your kitchen with pure joy—so grab those cherries and create something magical today!
Print
Homemade Cherry Pie Recipe
- Prep Time: 3 hours
- Cook Time: 55 minutes
- Total Time: 7 hours
- Yield: 8–10 servings 1x
- Category: Baking
- Method: Oven
- Cuisine: American
Description
Indulge in the sweet and tangy flavors of this Homemade Cherry Pie, made with a flaky, buttery pie crust and a juicy cherry filling. Perfect for any occasion!
Ingredients
Pie Crust:
- Homemade Pie Crust or All Butter Pie Crust (both recipes make 2 crusts, 1 for bottom and 1 for top)
Filling:
- 4 and 1/2 cups halved & quartered pitted fresh cherries
- 2/3 cup (135g) granulated sugar
- 1/4 cup (28g) cornstarch
- 1 Tablespoon (15ml) lemon juice
- 1 teaspoon pure vanilla extract
- 1/4 teaspoon almond extract
- 1 Tablespoon (14g) cold unsalted butter, cut into small cubes
- egg wash: 1 large egg beaten with 1 Tablespoon (15ml) milk
- optional: coarse sugar for sprinkling on crust
Instructions
- The crust: Prepare either pie crust recipe through step 5. The pie dough needs to chill in the refrigerator for at least 2 hours before using.
- Make the filling: In a large bowl, stir the cherries, sugar, cornstarch, lemon juice, vanilla, and almond extract together until thoroughly combined. Cover and refrigerate.
- Roll out the chilled pie dough: Roll out one disc of chilled dough and place in a pie dish. Fill with cherry mixture and refrigerate.
- Reduce the cherry juice: Cook the leftover juice until slightly thickened, then pour over cherries in filling.
- Arrange the lattice: Roll out the other disc of dough and create a lattice top. Brush with egg wash, sprinkle sugar, and chill.
- Bake: Preheat oven, place pie on a baking sheet, and bake at 400°F for 20 minutes, then reduce temperature to 375°F and bake for 30–40 minutes.
- Cool: Cool the pie for at least 3–4 hours before serving.
Notes
- Prepare pie 1 day in advance or freeze for later.
- Use a mix of halved and quartered cherries for best results.
- If using sour cherries, adjust sugar accordingly.
Nutrition
- Serving Size: 1 slice
- Calories: Approximately 350 calories
- Sugar: Approximately 25g
- Sodium: Approximately 150mg
- Fat: Approximately 15g
- Saturated Fat: Approximately 8g
- Unsaturated Fat: Approximately 7g
- Trans Fat: 0g
- Carbohydrates: Approximately 50g
- Fiber: Approximately 3g
- Protein: Approximately 4g
- Cholesterol: Approximately 45mg


