

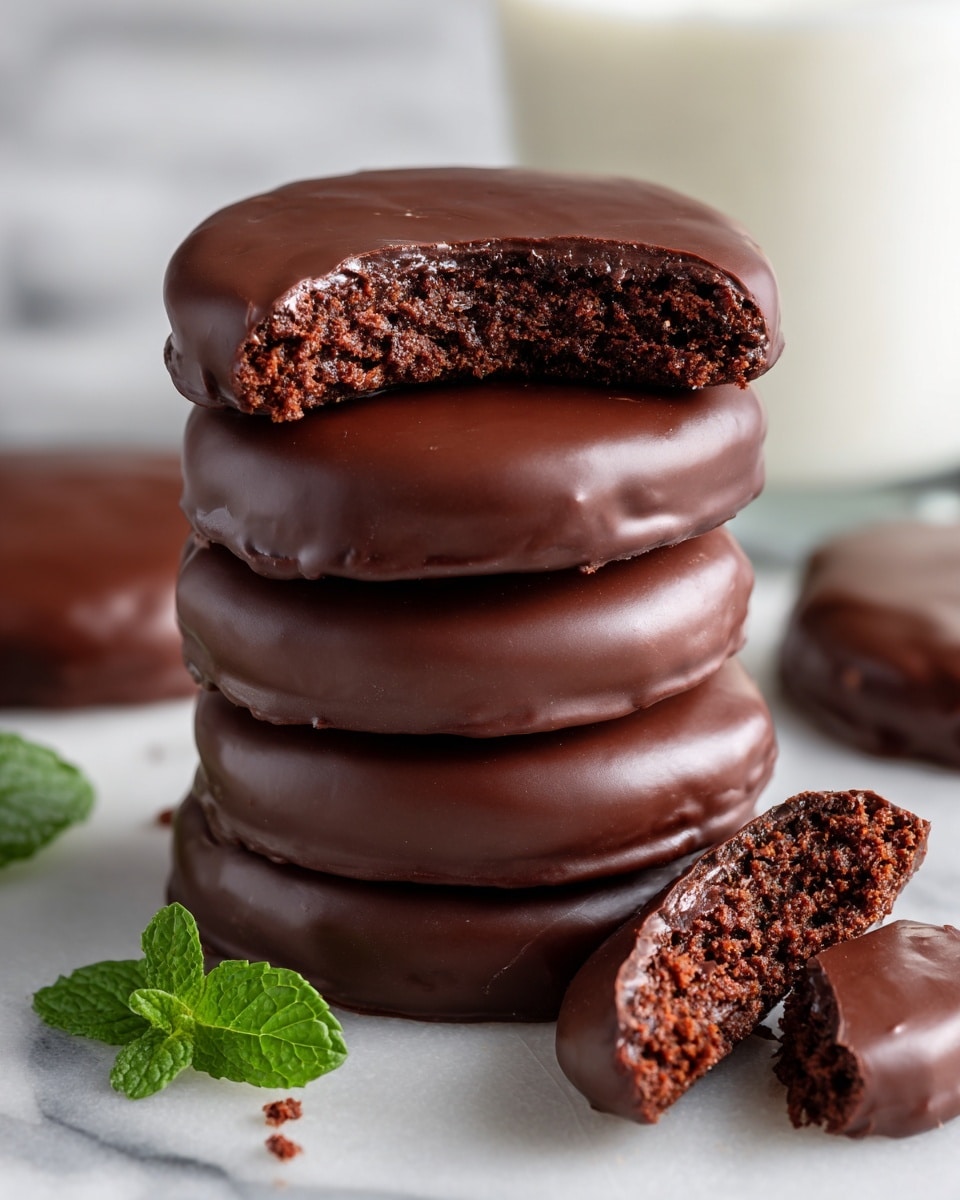
I absolutely love this Homemade Thin Mint-Inspired Cookies Recipe because it hits all the right notes—crispy, minty, and loaded with rich dark chocolate. When I first tried making Thin Mints at home, I wanted that perfect balance of refreshing peppermint and deep cocoa without the guesswork or preservatives. This recipe delivers that classic taste but with the fresh, homemade touch that’s impossible to beat.
You’ll find that these cookies are wonderfully versatile—they’re great for cozy winter nights, special occasions, or just a sweet treat after dinner. Plus, making them yourself means you can tweak the peppermint and chocolate to your exact liking, which is something store-bought Thin Mints don’t offer. Trust me, once you get the hang of this Homemade Thin Mint-Inspired Cookies Recipe, these will become your go-to crowd-pleaser.
Why You’ll Love This Recipe
- Authentic Flavor: You get the classic Thin Mint taste made fresh with real ingredients.
- Customizable Mint Intensity: Adjust the peppermint extract exactly how you like it for a personal touch.
- All-Chocolate Coating: A rich dark chocolate dip that seals in the minty goodness and adds crunch.
- Perfect Texture: Crispy edges but tender inside—you’ll be amazed how these cookies hold together after baking.

Ingredients You’ll Need
Every ingredient in this Homemade Thin Mint-Inspired Cookies Recipe plays a crucial role in nailing that iconic chocolate-mint cookie. I always recommend using good-quality cocoa powder and fresh peppermint extract to really boost the flavors.
- Flour: All-purpose flour forms the base of the cookie providing structure and chew.
- Unsweetened cocoa powder: Choose Dutch-processed for a smoother, richer chocolate taste.
- Baking soda: Helps the cookies spread just enough to get that perfect thin mint shape.
- Salt: Balances the sweetness and enhances flavor depth.
- Unsalted butter: Room temperature butter creates a light, fluffy dough with great body.
- Sugar: Granulated sugar adds the right amount of sweetness and crunch.
- Peppermint extract: The star of the show—adjust to your taste for mild or bold mint flavor.
- Dark chocolate: Look for a good 70% cacao dark chocolate to melt and dip the cookies for that shiny, bittersweet finish.
Variations
I love experimenting with this Homemade Thin Mint-Inspired Cookies Recipe to suit different occasions or dietary needs. Feel free to swap, add, or scale ingredients depending on what you’re craving or have on hand.
- Gluten-Free Version: I’ve had success using a 1-to-1 gluten-free baking flour blend—just keep an eye on dough texture to avoid dryness.
- Stronger Mint Flavor: Adding a half teaspoon of finely chopped fresh peppermint leaves gives a lovely, natural twist I tried last holiday season.
- Vegan Adaptation: Swap butter for coconut oil and choose dairy-free dark chocolate, and you’ll still get that minty chocolate bliss.
- White Chocolate Twist: If you’re feeling adventurous, drizzle white chocolate over these cookies instead of dipping for a lighter, creamier taste.
How to Make Homemade Thin Mint-Inspired Cookies Recipe
Step 1: Prep your oven and baking sheets
Start by preheating your oven to 350°F (175°C) and line two baking sheets with parchment paper or nonstick baking mats. This step is easy to overlook, but prepping ahead prevents sticking and ensures your cookies bake evenly. Believe me, it saves you from that frustrating moment when your cookies won’t lift off cleanly!
Step 2: Mix dry ingredients
In a medium bowl, whisk together flour, unsweetened cocoa powder, baking soda, and salt. I like to sift these ingredients to avoid any lumps, which can mess with your cookie’s texture. The cocoa gives these cookies their deep chocolate color and flavor, so make sure it’s well combined.
Step 3: Cream butter, sugar, and peppermint
Using a stand mixer or hand mixer, beat the room-temperature butter and sugar until light and fluffy—usually about five minutes. This is where your cookies get their tenderness and subtle crumb texture. Then, scrape down the bowl and add peppermint extract, mixing until evenly incorporated. The mint aroma at this stage is already irresistible!
Step 4: Combine dry with wet ingredients
Add the flour and cocoa mixture to the butter in two batches, mixing gently after each addition. You want a dough that’s just combined but still slightly crumbly; don’t overmix or the cookies might turn out tough. Once done, gather the dough into a ball, flatten it a bit, and wrap it tightly in plastic wrap to chill for 30 minutes.
Step 5: Roll and cut the cookies
After chilling, roll your dough out on a well-floured surface to about ¼ inch thickness. I like to use a small fluted round cookie cutter to capture that authentic Thin Mint look. If you don’t have one, a plain small round cutter works just fine. Gather scraps and reroll with extra flour if needed—you should get roughly two dozen cookies here.
Step 6: Bake and cool the cookies
Place your cut cookies onto prepared baking sheets and bake for 20 minutes. When they come out, they might feel crumbly but don’t worry—that’s how they’re supposed to be. Let them cool completely on the pans, as they’ll firm up beautifully once they’re at room temperature.
Step 7: Melt chocolate and add peppermint
Gently melt your dark chocolate in a double boiler until smooth, then stir in 1 to 2 teaspoons of peppermint extract—or adjust to your taste. This step is where the magic happens because the rich, minty chocolate coating is what pulls these cookies together like the real deal.
Step 8: Dip cookies and let them set
Using a fork, dip each cooled cookie into the melted chocolate, coating both sides evenly. Shake off any excess and transfer to a wire rack to let the chocolate set. It only takes about 20–30 minutes for the coating to harden, and then they’re ready to enjoy or store.
Pro Tips for Making Homemade Thin Mint-Inspired Cookies Recipe
- Use Room Temperature Butter: It creamed best and gave me lighter dough—cold butter makes it tough to mix well.
- Don’t Skip Chilling: The dough firms up so much easier to roll and cut after chilling; it helps keep the cookies thin and crisp.
- Choose Peppermint Extract Wisely: Some brands are super strong, so taste as you go to avoid overpowering your cookie.
- Chocolate Dipping Technique: Use a wire rack rather than parchment paper after dipping for even drying without sticking.
How to Serve Homemade Thin Mint-Inspired Cookies Recipe
Garnishes
I love sprinkling a tiny pinch of crushed peppermint candy or sea salt flakes on top of the chocolate before it dries. It adds a fun festive look and an extra crunch that really elevates these cookies when I serve them for guests.
Side Dishes
These cookies go perfectly with a tall glass of cold milk, peppermint hot chocolate, or even a cup of strong black coffee. For holiday parties, I like pairing them with simple vanilla ice cream—fancy, yet cozy!
Creative Ways to Present
For special occasions, I arrange these cookies in pretty gift boxes or stack them with wax paper in mason jars tied with a festive ribbon. I even tried making cookie sandwiches filled with mint-flavored buttercream last Christmas—everyone went crazy for that!
Make Ahead and Storage
Storing Leftovers
I store leftover cookies in an airtight container at room temperature, layering parchment paper between each batch to prevent sticking. They stay fresh and crisp for up to a week, which is perfect for enjoying over time or gifting to friends.
Freezing
If I want to save extra cookies, I freeze them in zip-top bags with parchment paper between layers. When ready to eat, they thaw quickly on the counter without losing their texture or flavor—just avoid freezing after chocolate dipping to prevent dulling the shine.
Reheating
These cookies are best enjoyed at room temperature, but if they’re feeling a bit firm from the fridge, I warm them for 5–10 seconds in the microwave. Just be careful not to overheat or the chocolate coating might soften too much.
FAQs
-
Can I use regular vanilla extract instead of peppermint?
Absolutely, but keep in mind that the signature mint flavor will be missing—if you want a similar fresh note without peppermint, try adding a small amount of almond extract or fresh zest like orange for a different twist.
-
Why do my cookies feel crumbly right after baking?
This is totally normal for this recipe! The cookies firm up as they cool down, gaining that perfect thin and crispy texture classic to Thin Mints.
-
Can I skip chilling the dough?
Chilling helps keep the dough firm and easier to handle, which leads to better shaped cookies that bake evenly. Skipping this step might result in cookies spreading too much or being less crisp.
-
What’s the best chocolate for dipping?
I recommend using good-quality dark chocolate with around 70% cacao—it melts smoothly, hardens nicely, and balances the sweetness of the cookie without overpowering the mint.
-
How long do these cookies keep fresh?
Stored in an airtight container at room temperature, your homemade Thin Mint-Inspired Cookies stay fresh and delicious for up to one week.
Final Thoughts
This Homemade Thin Mint-Inspired Cookies Recipe has become one of my favorite go-to treats to make, whether for a cozy night in or impressing guests during the holidays. There’s something so satisfying about pulling these mint-chocolate beauties fresh from your own kitchen and knowing exactly what’s inside. I truly think you’ll love the warm nostalgia and fresh flavor that only homemade cookies can bring—give it a try, and you might just have a new family tradition on your hands.
Print
Homemade Thin Mint-Inspired Cookies Recipe
- Prep Time: 15 minutes
- Cook Time: 20 minutes
- Total Time: 1 hour 5 minutes
- Yield: 2 dozen small cookies
- Category: Dessert
- Method: Baking
- Cuisine: American
- Diet: Vegetarian
Description
These Homemade Thin Mint-Inspired Cookies capture the classic flavors of the beloved Girl Scout treat with a rich chocolatey cookie base, infused with refreshing peppermint, then dipped in a smooth dark chocolate coating. Perfect for holiday cookie trays or anytime you crave a mint chocolate delight made from scratch.
Ingredients
For the Cookies:
- 1 3/4 cup all-purpose flour
- 3/4 cup unsweetened cocoa powder
- 1/2 teaspoon baking soda
- 1 teaspoon salt
- 1 cup unsalted butter, at room temperature
- 1/2 cup granulated sugar
- 2 teaspoons peppermint extract
For the Dipping Chocolate:
- 12 ounces dark chocolate, chopped
- 1 to 2 teaspoons peppermint extract (adjust to taste)
Instructions
- Preheat and Prepare Baking Sheets: Set your oven to 350°F (175°C). Line two baking sheets with parchment paper or nonstick baking mats to prevent sticking during baking.
- Mix Dry Ingredients: In a medium bowl, whisk together the flour, cocoa powder, baking soda, and salt until well combined.
- Cream Butter and Sugar: Using a stand mixer, beat the room-temperature butter and sugar on medium-high speed until light, fluffy, and pale, about five minutes. Scrape down the bowl sides to ensure even mixing. Add the peppermint extract and mix briefly to incorporate.
- Combine Dry and Wet Ingredients: Add the dry flour mixture in two parts into the butter mixture. Mix on low speed until just combined; the dough will still be slightly crumbly. Gather the dough into a ball, flatten it slightly, wrap tightly in plastic wrap, and chill for 30 minutes to firm up.
- Roll and Cut Cookies: On a generously floured surface, roll the chilled dough to about 1/4-inch thickness. Use a small round cookie cutter—preferably with fluted edges for an authentic look—to cut out cookies. Gather scraps, re-roll if necessary, adding flour to prevent sticking. You should yield approximately two dozen small cookies.
- Bake the Cookies: Place cookies on the prepared baking sheets spaced evenly apart. Bake for 20 minutes until set. Once out of the oven, allow cookies to cool completely on the baking sheets; they will be fragile but will firm up as they cool.
- Melt Chocolate and Add Peppermint: Melt the chopped dark chocolate in a double boiler or heatproof bowl set over simmering water until smooth. Remove from heat and stir in 1 to 2 teaspoons peppermint extract, adjusting to taste.
- Dip Cookies in Chocolate: Using a fork, dip each cooled cookie into the melted chocolate, coating both sides completely. Allow excess chocolate to drip off before placing the cookies on a wire rack to dry and set.
- Store Properly: Once the chocolate coating has hardened, store cookies in an airtight container. They can be kept fresh for up to one week.
Notes
- For perfectly shaped cookies, chill the dough as instructed and flour the surface generously before rolling.
- If you prefer a stronger peppermint flavor, adjust the peppermint extract in both the dough and chocolate coating accordingly.
- Use high-quality dark chocolate for the best taste and smooth dipping texture.
- Cookies can be stored in a cool, dry place. For longer storage, consider freezing the uncoated cookies and dipping after thawing.
- If you don’t have a double boiler, microwave the chocolate in short, 20-second bursts, stirring in between to avoid burning.
Nutrition
- Serving Size: 1 cookie
- Calories: 110
- Sugar: 7g
- Sodium: 95mg
- Fat: 7g
- Saturated Fat: 4g
- Unsaturated Fat: 3g
- Trans Fat: 0g
- Carbohydrates: 11g
- Fiber: 1.5g
- Protein: 1g
- Cholesterol: 20mg


