

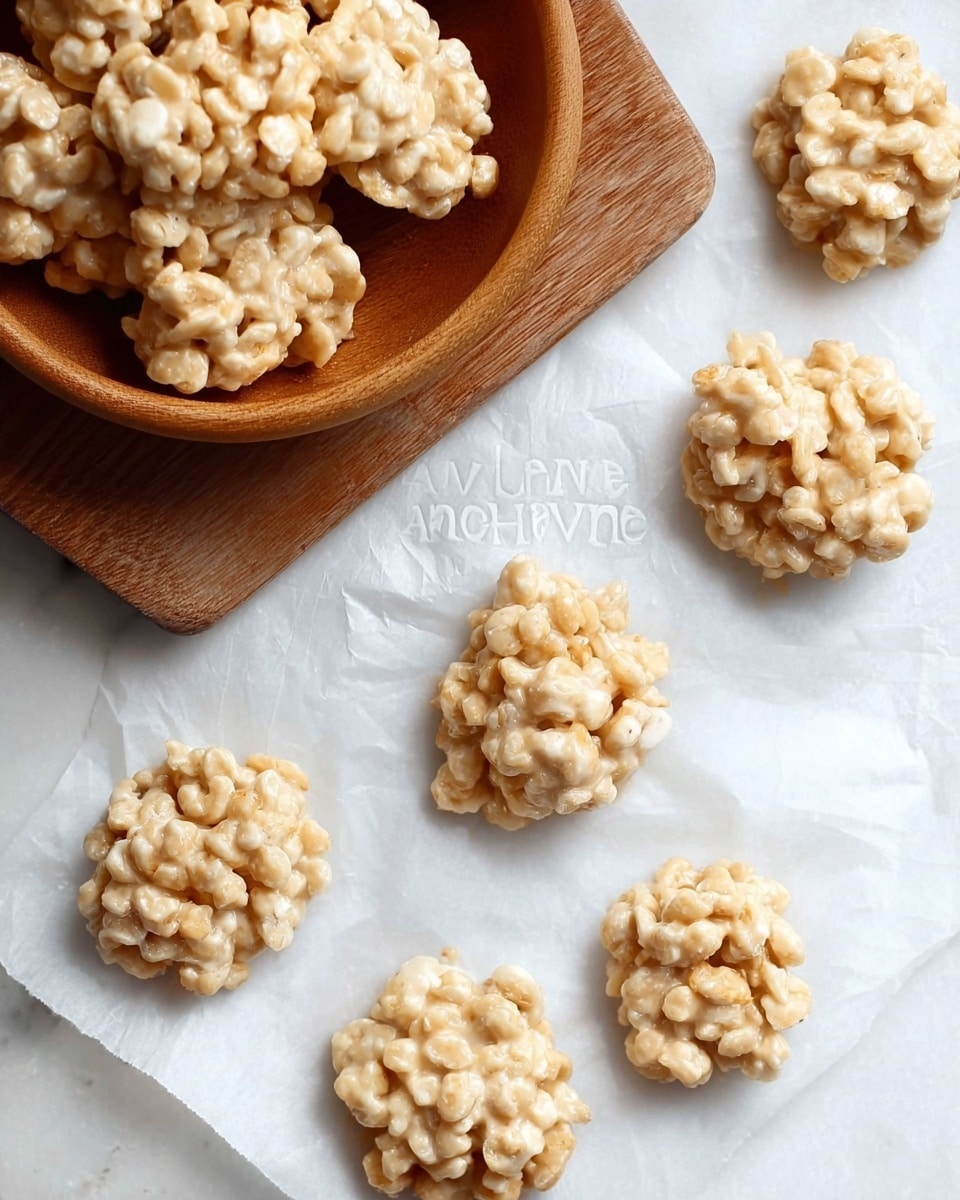
I absolutely love sharing this No Bake Avalanche Cookies Recipe because it’s one of those no-fuss, seriously delicious treats that come together in no time. When I first tried it, I was amazed at how simple ingredients like crispy rice cereal, marshmallows, and white chocolate could create something so addictively good. You’ll find that this cookie is perfect for when you want to whip up a sweet snack without heating up the kitchen or waiting forever for baking.
This No Bake Avalanche Cookies Recipe works wonderfully for last-minute gatherings, kid-friendly snacks, or even a cozy afternoon pick-me-up. Plus, it’s a fun recipe to make with kids since there’s no stove involved, just mixing and chilling. The creamy peanut butter mixed with smooth melted white chocolate adds a rich, comforting flavor that makes these cookies stand out on any dessert table.
Why You’ll Love This Recipe
- Quick and Easy: No baking required means you can have sweet treats ready in about 15 minutes flat.
- Perfect Texture: Crispy rice cereal and mini marshmallows combine for a delightful crunch and chew.
- Family Favorite: Kids and adults alike go crazy for these simple yet delicious cookies.
- Versatile and Customizable: You can easily toss in mini chocolate chips or swap in different nut butters for your taste.

Ingredients You’ll Need
The ingredients for this No Bake Avalanche Cookies Recipe are straightforward and easy to find – no complicated shopping trips required. What’s fun is how these pantry staples come together to create a treat that’s both crunchy and creamy, sweet and satisfying.
- Crispy Rice Cereal: Gives your cookies that perfect light crunch and helps bind everything together.
- Mini Marshmallows: Melt slightly to add softness and a chewy contrast to the crispy cereal.
- Creamy Peanut Butter: Adds richness and a hint of saltiness to balance the sweetness.
- White Chocolate: Melted smooth, it coats the cereal and marshmallows, holding your cookies in place.
- Mini Chocolate Chips (optional): A sprinkle on top for extra chocolatey goodness and visual appeal.
Variations
I love how this No Bake Avalanche Cookies Recipe invites you to get creative since the base is so simple. Over time, I’ve tried a few tweaks here and there, and I encourage you to experiment with flavors and textures too—that’s the best part of no-bake treats like this!
- Chocolate Lovers’ Version: Adding mini chocolate chips on top is my go-to for a little extra richness—I swear it takes these cookies to another level.
- Nut Butter Swap: Sometimes I use almond or cashew butter instead of peanut butter, which changes the flavor profile nicely without messing up the texture.
- Extra Crunch: Toss in chopped nuts or toasted coconut flakes for a pleasant surprise bite.
- Marshmallow-Free: If you want to skip marshmallows, try swapping with dried fruit for some chewy sweetness.
How to Make No Bake Avalanche Cookies Recipe
Step 1: Prepare and Mix the Dry Ingredients
Start by lining two baking sheets with parchment paper—that way your cookies won’t stick and cleanup is a breeze. In a large bowl, mix together the crispy rice cereal and mini marshmallows until they’re evenly combined. This step is key because you want every bite to have that perfect balance of crunch and soft chew.
Step 2: Melt the White Chocolate and Peanut Butter
I like to melt the white chocolate and peanut butter together in a double boiler because it allows them to melt evenly without burning—white chocolate can be a bit finicky. But if you’re short on time, microwaving in short bursts works just fine; just be sure to stir often. Once smooth and fully melted, this luscious mixture will be the glue holding your cookies together.
Step 3: Combine and Coat
Pour the melted white chocolate and peanut butter over your cereal and marshmallow mix. Stir quickly but gently until everything is thoroughly coated. The key here is to work fast before the mixture starts to set—it should look glossy and evenly distributed. If it’s not fully coated, your cookies won’t stick together properly.
Step 4: Form the Cookies
Using a tablespoon, drop dollops of the mixture onto your prepared baking sheets. This part is fun and totally forgiving since these cookies don’t have to be perfect circles. If you like a few mini chocolate chips on top, sprinkle them on each mound now for that delightful finishing touch. Then pop the trays into the refrigerator to set for about 30 minutes or until firm.
Step 5: Enjoy and Store
Once your cookies are set, they’re ready to enjoy! You can store them in an airtight container at room temperature if your kitchen isn’t too warm, or keep them in the fridge to avoid any stickiness. These cookies stay fresh for up to five days—though honestly, they rarely last that long in my house.
Pro Tips for Making No Bake Avalanche Cookies Recipe
- Double Boiler Melting: Melting white chocolate and peanut butter slowly prevents scorching and ensures a silky coating.
- Mix Quickly: Stir the melted mixture into the cereal while it’s still warm to coat evenly before it starts to harden.
- Portion Control: Use a tablespoon or small cookie scoop to keep cookies uniform for even setting.
- Prevent Stickiness: Store cookies in a cool place to avoid them becoming sticky – the refrigerator is your friend on warmer days.
How to Serve No Bake Avalanche Cookies Recipe
Garnishes
I usually keep it simple with a sprinkle of mini chocolate chips on top for a cute chocolate peek, but when I want to get fancy, a tiny dusting of powdered sugar or some festive sprinkles adds just the right pop. These little touches can make the cookies look great for parties without extra effort.
Side Dishes
These avalanche cookies pair really well with a cold glass of milk or even a warm cup of coffee or hot cocoa. If you’re hosting brunch or an afternoon gathering, add fresh fruit or a simple yogurt parfait to balance the sweetness of the cookies.
Creative Ways to Present
For special occasions, I love stacking the cookies in a mason jar or wrapping them individually in clear cellophane with a ribbon for cute party favors. You can even arrange them on a festive platter with a small bowl of chocolate chips for dipping—perfect for holiday dessert tables or kid parties.
Make Ahead and Storage
Storing Leftovers
Leftover No Bake Avalanche Cookies keep well stored in an airtight container at room temperature if your house is cool, but I often refrigerate them to be safe, especially in warm weather. They hold their texture and flavor nicely for about 4 to 5 days before any stickiness sets in.
Freezing
If you want to make a big batch ahead of time, freezing works like a charm. Just place the cookies in a single layer on a tray first, freeze until solid, then transfer to a sealed freezer bag. They’ll keep for up to a month, which is great when you want to save some for later or send some with a friend.
Reheating
Because these cookies are best enjoyed cold or at room temperature, I usually let frozen cookies thaw on the counter for 15-20 minutes before serving. You don’t want to microwave them, or they’ll get gooey and lose their crispness, so slow thawing is the way to go to maintain their delightful texture.
FAQs
-
Can I use other types of chocolate instead of white chocolate?
Absolutely! While white chocolate gives the cookies a creamy sweetness, you can substitute milk or semi-sweet chocolate if you prefer a deeper cocoa flavor. Just melt it with the peanut butter the same way, but be mindful that darker chocolates may change the overall sweetness.
-
Do I need to refrigerate these cookies?
Refrigeration isn’t mandatory, but I recommend it especially in warm climates to prevent the peanut butter and chocolate from getting sticky or melting. If your kitchen is cool, storing in an airtight container at room temperature works well for a few days.
-
Can I make these cookies vegan or allergy-friendly?
To make vegan-friendly No Bake Avalanche Cookies, look for dairy-free white chocolate and substitute peanut butter with a nut-free alternative like sunflower seed butter if allergies are a concern. Just check that the marshmallows you use are vegan since many contain gelatin.
-
How do I keep my cookies from sticking to the baking sheet?
Lining your baking sheets with parchment paper is the best way to prevent sticking. Avoid greasing the pan as that can make the cookies greasy or messy. Once set, the cookies lift right off easily.
-
Can I add other mix-ins to the recipe?
Definitely! Feel free to toss in chopped nuts, dried fruit, shredded coconut, or even some toffee bits. Just be sure to keep the total volume similar so the mixture holds together well.
Final Thoughts
This No Bake Avalanche Cookies Recipe is truly one of my favorite quick and easy dessert hacks. It’s forgiving, fast, and totally kid-friendly, which makes it a go-to whenever I need a satisfying sweet treat without fuss. I can’t recommend it enough as a simple way to impress friends, treat your family, or just enjoy a little sweet adventure any day of the week. Give it a try, and I bet you’ll find yourself making these over and over!
Print
No Bake Avalanche Cookies Recipe
- Prep Time: 15 minutes
- Cook Time: 0 minutes
- Total Time: 15 minutes (plus chilling time of 30-60 minutes)
- Yield: 24 cookies
- Category: Dessert
- Method: No-Cook
- Cuisine: American
- Diet: Vegetarian
Description
No Bake Avalanche Cookies are a delicious and easy-to-make treat combining crispy rice cereal, gooey mini marshmallows, and creamy peanut butter all coated in smooth white chocolate. These cookies require no baking and are perfect for quick snacks or celebrations, optionally topped with mini chocolate chips for extra indulgence.
Ingredients
Main Ingredients
- 2 cups Crispy Rice cereal
- 1 cup mini marshmallows
- 1/2 cup creamy peanut butter
- 1 lb white chocolate
- 1/4 cup mini chocolate chips (optional, for sprinkling)
Instructions
- Prepare baking sheets: Line 2 baking sheets with parchment paper and set them aside to use for placing the cookies once formed.
- Mix dry ingredients: In a large bowl, combine the crispy rice cereal and mini marshmallows thoroughly. Set this mixture aside for the chocolate coating step.
- Melt white chocolate and peanut butter: Using a double boiler, melt the white chocolate and creamy peanut butter together slowly to ensure smooth consistency. Alternatively, you may use the microwave in short bursts, stirring frequently to avoid burning.
- Combine mixture: Pour the melted white chocolate and peanut butter over the cereal and marshmallow mixture. Stir gently and thoroughly until every piece is completely coated.
- Form cookies: Using a tablespoon, scoop the mixture and drop it onto the prepared baking sheets, shaping into cookie-sized clusters.
- Optional topping: Sprinkle mini chocolate chips over each cookie cluster for extra flavor and decoration, if desired.
- Set cookies: Place the baking sheets in the refrigerator for the cookies to set completely. This usually takes until the chocolate hardens, about 30 to 60 minutes.
Notes
- Store the cookies in an airtight container in a cool place for up to 5 days.
- Refrigeration is not mandatory but recommended especially in warmer climates to prevent stickiness.
- Use a double boiler to melt the white chocolate to avoid overheating and ensure smooth texture.
- If preferred, microwave can be used for melting, but heat in short increments and stir frequently.
Nutrition
- Serving Size: 1 cookie
- Calories: 141
- Sugar: 11.8 g
- Sodium: 56.6 mg
- Fat: 8.6 g
- Saturated Fat: 4.5 g
- Unsaturated Fat: 3.5 g
- Trans Fat: 0 g
- Carbohydrates: 14.7 g
- Fiber: 0.5 g
- Protein: 2.5 g
- Cholesterol: 3.7 mg


