

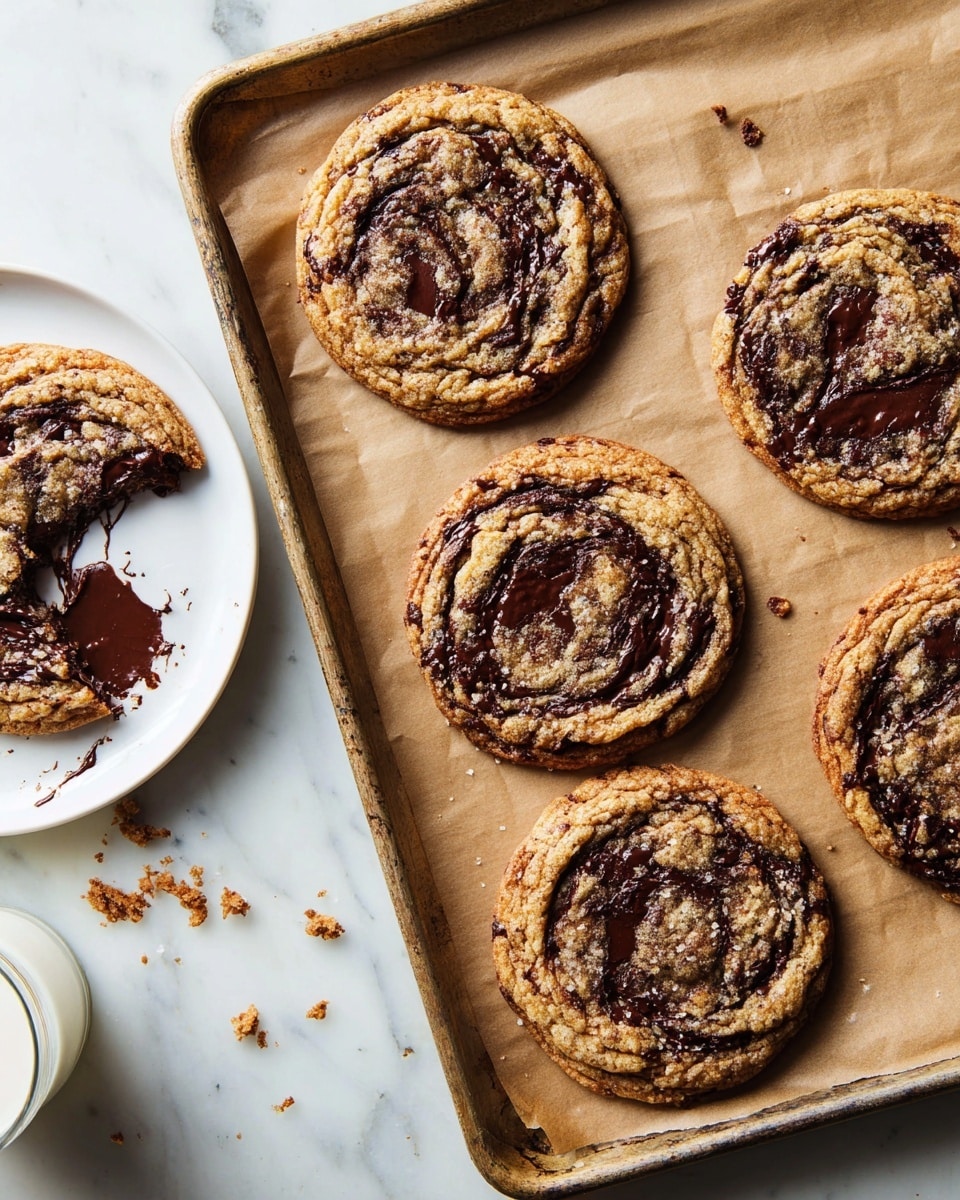
I absolutely love sharing this Wrinkly Chocolate Chip Cookies Recipe because it turns out cookies that are unlike any other—soft, gooey centers wrapped in wrinkly, crackly edges that just scream homemade comfort. When I first tried this recipe, I was amazed at how the unique “bang the pan” trick transforms regular cookie dough into these wonderfully textured treats that my family can’t get enough of.
You’ll find that these cookies work perfectly when you want an easy but impressive bake, whether it’s for an afternoon snack, a casual get-together, or just because you deserve a little sweet decadence. The balance of bittersweet chocolate chunks and that subtle flaky salt sprinkle really takes these cookies to the next level, making every bite an absolute delight.
Why You’ll Love This Recipe
- Unique Wrinkly Texture: The pan-banging technique creates those irresistible wrinkles that set these cookies apart.
- Perfect Gooey Centers: You get soft, melty centers surrounded by golden edges, which is pure cookie heaven.
- Simple Yet Impressive: This recipe uses everyday ingredients but produces bakery-quality cookies at home.
- Family Favorite: My kids go crazy for these, and they’re perfect for sharing or gifting.

Ingredients You’ll Need
Each ingredient here plays a crucial role in achieving that perfectly wrinkled texture and deep chocolate flavor. Using real butter and high-quality bittersweet chocolate really makes a difference.
- Unsalted butter: Room temperature for easy creaming and best cookie texture.
- Granulated sugar: Adds crispness and sweetness.
- Light or dark brown sugar: Packed for moisture and a slight caramel flavor.
- Kosher salt: Balances sweetness and enhances flavors.
- Large egg: Binds ingredients and helps with softness.
- Water: Adds moisture to the dough for chewy centers.
- Pure vanilla extract: Deepens the flavor.
- Baking soda: Helps cookies spread and develop texture.
- All-purpose flour: The base for your cookie dough structure.
- Bittersweet chocolate: Chopped into various sizes for texture variety in chewy bites.
- Flaky salt (optional): Sprinkled on top to contrast the sweetness and emphasize chocolate flavors.
Variations
I love tweaking this Wrinkly Chocolate Chip Cookies Recipe depending on the occasion or my mood. Feel free to experiment a bit—it’s all about making the cookie your own!
- Nutty upgrade: I sometimes add chopped toasted walnuts or pecans to add an extra crunch that contrasts beautifully with the soft centers.
- Vegan twist: Substitute butter with vegan margarine and egg replacer to share these wonders with dairy-free friends (although the texture changes slightly).
- Spiced version: Adding a pinch of cinnamon or espresso powder can deepen the chocolate flavor and add warmth during colder months.
- Chocolate swap: Swap bittersweet chocolate with milk chocolate or a mix of white chocolate chunks for different flavor dimensions.
How to Make Wrinkly Chocolate Chip Cookies Recipe
Step 1: Prepare Your Baking Setup
First, adjust your oven rack to the middle position to ensure even baking. Line two sheet pans with aluminum foil (dull side up), parchment paper, or silicone mats—whatever you have on hand works perfectly. This setup makes your cookie cleanup so easy and guarantees your cookies won’t stick or burn on the bottom.
Step 2: Cream Butter and Sugars
In a stand mixer fitted with the paddle attachment, beat your room-temperature butter on medium speed until creamy—this usually takes about a minute or two. Scrape down the sides of the bowl, then add both sugars and kosher salt. Beat again on medium until the mixture is light, fluffy, and pale, about 2 to 3 minutes. This creaming step is key for that tender crumb and helps your cookies spread just right.
Step 3: Add the Wet Ingredients
Mix in the egg, the tablespoon of water, and the vanilla extract on low speed to combine everything without overmixing. Then add the baking soda and mix just until combined. Anything more can lead to tough cookies, and nobody wants that!
Step 4: Incorporate Flour and Chocolate
Add the flour last and mix on low speed until the dough is almost fully combined—you want to avoid overworking the gluten. Then fold in your chopped bittersweet chocolate chunks and shards so you get different textures with each bite. At this stage, you can refrigerate the dough for several hours or overnight, which some cookie buffs swear makes the flavor even better.
Step 5: Shape and Freeze Your Cookie Dough Balls
Preheat your oven to 350°F (177°C). Scoop out dough into roughly 100-gram balls—about a heaping 1/3 cup size works well. Place them on a plate and sprinkle each ball generously with flaky salt if you want that salty-sweet finish. Pop the plate in the freezer for 15 minutes; this step helps the cookies hold their shape and develop that iconic wrinkly surface.
Step 6: Bake and Bang Your Pans
Arrange 4 cookie balls evenly spaced on your prepared sheet pan and bake for 10 minutes. The cookies should look puffed in the center. Here’s the secret: lift the sheet pan and bang it firmly down against the oven rack—this deflates the centers and sets the edges, creating those wonderful wrinkles. Wait 3 minutes for the cookies to puff back up, then bang again. Repeat this lift-and-bang motion 1-2 more times during baking. Finish baking for a total of 16-18 minutes until the cookies spread wide, edges turn golden brown, and centers stay gooey.
Step 7: Cool and Enjoy
Let the cookies rest on the sheet pan for about 10 minutes before transferring them to a wire rack to cool completely. This resting time lets the gooey center set slightly without losing its softness. Then, bake the remaining dough balls the same way and get ready to enjoy fresh batches of that wrinkly, chocolatey magic.
Pro Tips for Making Wrinkly Chocolate Chip Cookies Recipe
- Don’t Skip the Freezing: Even a short freeze firms up the dough so your cookies keep their shape and develop the best texture.
- Pan-Banging Is Essential: It might feel silly at first, but that banging step makes all the difference to create those trademark wrinkles.
- Use a Kitchen Scale: Weighing cookie dough balls helps them bake evenly — consistent size means consistent cookies!
- Don’t Overbake: Pull them out while centers are still soft to keep that melty cookie magic.
How to Serve Wrinkly Chocolate Chip Cookies Recipe
Garnishes
I usually finish off these cookies with a tiny sprinkle of flaky sea salt right before baking—it really amps up the chocolate’s richness and creates that perfect balance of sweet and salty. Sometimes, I add a little dusting of powdered sugar for a pretty presentation during the holidays.
Side Dishes
These cookies pair perfectly with a cold glass of milk or a frothy cappuccino. If you’re making them for brunch, I love serving them alongside fresh fruit or a scoop of vanilla ice cream for an indulgent dessert treat.
Creative Ways to Present
For parties, I like arranging these wrinkly beauties on a rustic wooden board lined with parchment, scattering a few chocolate shards and nuts around for a cozy, inviting look. Wrapping stacks in parchment and tying with baker’s twine makes charming edible gifts your friends and family will rave about.
Make Ahead and Storage
Storing Leftovers
I store leftover cookies in an airtight container at room temperature for up to 3 days, adding a slice of bread inside to help keep them soft and moist. It really works to prevent them from drying out too quickly.
Freezing
If I want to make these in advance, I scoop and freeze the raw dough balls individually on a baking sheet first, then transfer them to a freezer bag. When I’m ready to bake, I just add a few extra minutes to the baking time, and they come out just as amazing as fresh ones.
Reheating
To refresh leftover cookies, I pop them in the microwave for about 10-15 seconds or warm them in a 300°F (150°C) oven for 5 minutes. This revives that soft, gooey texture that makes these cookies so irresistible.
FAQs
-
What makes the cookies get that wrinkly texture?
The wrinkly effect comes from the unique pan-banging technique during baking, which deflates the cookie centers and sets the edges repeatedly, creating those iconic cracks and wrinkles on top.
-
Can I skip refrigerating or freezing the dough?
While you can skip chilling, freezing the dough balls for at least 15 minutes before baking helps the cookies hold their shape better and develop the classic wrinkly look and texture.
-
Will these cookies be soft or crispy?
These cookies have golden crisp edges and a soft, gooey center — a lovely contrast that makes them so addictive.
-
Can I use chocolate chips instead of chopped chocolate?
Yes! Chopped bittersweet chocolate chunks provide different textures with shards and melting pockets, but quality chocolate chips work fine if that’s what you have.
Final Thoughts
Honestly, this Wrinkly Chocolate Chip Cookies Recipe has quickly become my go-to for impressing guests or treating my family with something special but simple to make. I love how the texture and flavor come together in such a unique way, and you’ll enjoy sharing these just as much as I do. Grab your mixing bowl, get ready to bang those pans, and trust me—you’re about to make some unforgettable cookies.
Print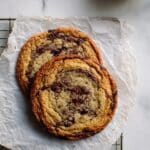
Wrinkly Chocolate Chip Cookies Recipe
- Prep Time: 40 minutes
- Cook Time: 36 minutes
- Total Time: 1 hour 16 minutes
- Yield: About 10 cookies
- Category: Dessert
- Method: Baking
- Cuisine: American
Description
These Wrinkly Chocolate Chip Cookies are deliciously soft and gooey with perfectly crisp edges. The secret to their unique texture lies in a special pan-banging technique during baking that creates beautiful wrinkles on the cookie surface. Made with rich bittersweet chocolate chunks and a touch of flaky salt on top, these cookies offer a delightful balance of sweet and slightly salty flavors, perfect for any chocolate lover.
Ingredients
Cookie Dough
- 1/2 pound (2 sticks, 227 grams) unsalted butter, at room temperature
- 1 cup (200 grams) granulated sugar
- 3/4 cup (160 grams) packed light or dark brown sugar
- 3/4 teaspoon kosher salt
- 1 large egg
- 1 tablespoon water
- 1 1/2 teaspoon pure vanilla extract
- 1/2 teaspoon baking soda
- 2 cups (256 grams) all-purpose flour
- 8 ounces (227 grams) bittersweet chocolate, chopped (some chunks, some shards)
Topping
- Flaky salt, to sprinkle on top (optional)
Instructions
- Prepare Baking Sheets: Adjust an oven rack to the middle position and line two sheet pans with aluminum foil (dull side facing up), parchment paper, or silicone mats to prevent sticking.
- Make the Dough: In a stand mixer fitted with a paddle attachment, beat the butter on medium speed until creamy, about 2 minutes. Add granulated sugar, brown sugar, and kosher salt; beat on medium until light and fluffy, about 2 to 3 minutes, scraping the bowl as necessary. Add the egg, vanilla extract, and water, mixing on low until combined. Mix in baking soda, then add flour and mix until almost combined. Finally, fold in the chopped bittersweet chocolate. You can refrigerate the dough for several hours or overnight if desired.
- Preheat Oven and Prepare Dough Balls: Heat oven to 350°F (175°C). Scoop dough into 100-gram balls (about a heaping 1/3 cup each). Sprinkle with flaky salt if using. Place the dough balls on a plate and freeze for 15 minutes to help them hold their shape during baking.
- Bake with Pan-Banging Technique: Place 4 dough balls evenly spaced on one prepared sheet pan. Bake for 10 minutes until cookies are slightly puffy in the center. Remove the sheet pan and lift it a few inches above the oven rack, then drop it down firmly so the cookies’ edges set and centers deflate. Repeat lifting and dropping the pan 3 minutes later, after the cookies puff up again, 1 to 2 more times to achieve wrinkly tops. Continue baking for a total of 16 to 18 minutes until cookies are spread, edges are golden brown, and centers remain gooey.
- Cool the Cookies: Let cookies cool on the sheet pan for about 10 minutes before transferring them to a wire rack to cool completely. Repeat baking the remaining dough balls using the same technique.
Notes
- Freezing the dough balls before baking helps maintain their shape and texture.
- The pan-banging technique is key to creating the signature wrinkly texture of these cookies.
- You can refrigerate the dough overnight for deeper flavor development and easier handling.
- Use high-quality bittersweet chocolate for rich flavor and varied texture from chunks and shards.
- Sprinkling flaky salt on top balances sweetness and enhances flavor.
- Baking time may vary slightly depending on your oven; watch for golden edges and gooey centers.
Nutrition
- Serving Size: 1 cookie (approx. 80 grams)
- Calories: 380
- Sugar: 30 grams
- Sodium: 160 milligrams
- Fat: 22 grams
- Saturated Fat: 13 grams
- Unsaturated Fat: 8 grams
- Trans Fat: 0 grams
- Carbohydrates: 45 grams
- Fiber: 3 grams
- Protein: 5 grams
- Cholesterol: 50 milligrams


